Today let’s take a look at my variation of the traditional Star Geese quilt block. The original is a nice block (I’ll post a picture later in the tutorial) but I really like how this one looks in a quilt. We’re going to be doing a bit of paper piecing but it’s an easy unit to do. Let’s get started!
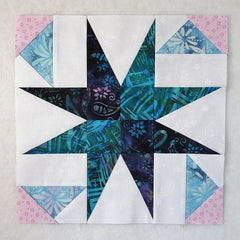
Fabric Requirements for a 12″ Finished Star Geese Quilt Block:
- Light/White: 4 – 5″ squares, 4 – 2.5″ x 4.5″ rectangles, and 4 – 2.5″ squares
- Light/Blue: 4 – 2.5″ x 4.5″ rectangles
- Light/Purple: 4 – 2.5″ squares
- Dark/Aqua: 2 – 2.5″ squares, and 4 – 3″ x 6″ rectangles
- Dark/Purple: 2 – 2.5″ squares, and 4 – 3″ x 6″ rectangles

You’ll also need 4 Triangle in a Square paper piecing templates which you can download HERE. Be sure to print them out without scaling – they should measure 4.5″ square.

Sewing Directions:
Four Patch Unit:
Step 1:
Using the Dark/Aqua and Dark/Purple 2.5″ squares, make a Four Patch unit. In the picture below you can see that I’ve sewn them into two rows and pressed the seam allowances in opposite directions.

Step 2:
Then sew the two rows together and press the seam allowance. You only need one unit – I just made two to help with the photos. You can find my tutorial for making a basic Four Patch block at https://quiltembroiderypdf.com/how-to-sew-a-basic-four-patch-quilt-block which shows several ways to create the block.

Corner Units:
Step 3:
We’re going to be making a three-color Flying Geese patch next. You can find my no-trim method for making perfect Flying Geese blocks at https://quiltembroiderypdf.com/how-to-sew-a-basic-flying-geese-block.
Using a Light/White 2.5″ square and a Light/Blue 2.5″ x 4.5″ rectangle, sew the first four steps of the patch:
- Mark a diagonal line from corner to corner on the back of Light/White 2.5″ squares.
- Sew the Light/White square to the Light/Blue rectangle along the marked line (top image). Note the orientation of the marked line.
- Match the corners of the Light/White square and press (second image).
- Trim away the excess seam allowance (third image).
- Refold (bottom image).

Step 4:
Repeat Step 3 only use a Light/Purple 2.5″ square on the adjacent corner of the rectangle as shown in the picture below.

Step 5:
Repeat Steps 3 and 4 for a total of four Flying Geese patches.
Step 6:
Sew a Light/White 2.5″ x 4.5″ rectangle to a Flying Geese patch and press the seam allowance toward the white fabric as shown below.

Step 7:
Repeat Step 6 for a total of four Corner units like the ones in the picture below.

Triangle in a Square Units:
Step 8:
I’m going to be using the paper piecing method to construct this unit. If you decide to use the same method, you’ll need to print out 4 of the templates (2 sheets of paper) which you can download HERE. You can find detailed step-by-step instructions for making this unit in my tutorial at https://quiltembroiderypdf.com/how-to-make-a-triangle-in-a-square-quilt-block.
Using 1 template, 1 – 5″ square, 1 – Dark/Aqua 3″ x 6″ rectangle and 1 – Dark/Purple 3″ x 6″ rectangle, make a Triangle in a Square unit like the one in the picture below (purple on left, aqua on right). Repeat for a total of two units.
You can see what the front and the back of the unit look like before trimming.

Step 9:
Now you will make two more Triangle in a Square units only reverse the dark fabrics (aqua on the left and purple on the right). Here you can see what the units look like after trimming and removing the papers.

Step 10:
Here are all four of the units.

Putting It All Together:
Step 11:
Lay out the Triangle in a Square units, the Corner units, and the center Four Patch unit as shown in the picture below. From here the block goes together like a basic Nine Patch block.

Step 12:
Sew the units into two rows as shown.

Step 13:
Press the seam allowances away from the Triangle in a Square units as shown in the picture below.

Step 14:
Sew the three rows together to complete the block!

Step 15:
Press the seam allowances toward the center of the block.

Layout Suggestions:
So here’s a layout using the original block. Personally, I think it’s a bit busy and the secondary design (Windblown block) gets lost.

Here’s a basic 4 x 4 layout using this variation of the block. I think the secondary design (on-point Friendship Star) shows up better and makes for an overall better quilt.

In this example, I added in narrow sashing and cornerstones.

Fall colors.

Christmas colors.

Here’s an on-point layout.

Another on-point with solid setting triangles.

And this is also an on-point layout with sashing and cornerstones.
