The Triangle in a Square block can be constructed a few different ways. While simple, the block can be tricky so let’s learn how to successfully piece it together.
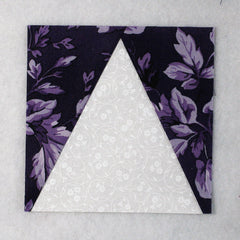
This block is also called Peaky and Spike and usually is used as a unit in another larger quilt block. There are three different ways this block can be constructed – by templates, paper piecing, and by special rulers. Let’s look at paper piecing and rulers!
Paper Piecing Requirements for a 4″ Finished Triangle in a Square Quilt Block:
- Template: 1 per block (you can download a template HERE) Cut out with an additional 1/4″ or so around each template
- Light/White: 1 – 5″ square (approximate)
- Dark/Purple: 2 – 3″ x 6″ rectangles (approximate)

Sewing Directions:
Step 1:
Pair up one template with the Light/White 5″ square – WRONG sides together.

Step 2:
Notice: fabric406 is supported by readers. When you buy with my links, I may earn a commission. Learn more
Either pin them together in the middle or use a fabric glue stick. I really like the Roxanne Glue Stick shown below. This glue dries clear, washes out, is odorless, acid-free, and non-toxic, AND fabric is easy to reposition if necessary.

Step 3:
Position one of the Dark/Purple 3″ x 6″ rectangles on top of the Light/White square (right sides together). Make sure the rectangle is positioned so that when you fold back the rectangle after sewing, it will cover the Light/White square corner. Glue or pin together.

Step 4:
Turn over and sew on the diagonal line of the template. Shorten your stitch length to about 1.5 so that the paper will be easy to remove after you’ve completed sewing the block.

Here’s picture from the other (right) side after sewing the first seam.

Step 5:
Fold back the template paper along the seam line and trim the seam allowance as shown in the picture below.

Step 6:
Now you can turn the unit back over to the right side and press as shown below. Half done!

Step 7:
Repeat Steps 3 through 5 for the opposite diagonal seam.

Step 8:
Once again, fold back the template paper on the seam line and trim the seam allowance as shown in the picture below.

Step 9:
Turn back over and press as shown in the picture below.

Step 10:
With the template side facing up, trim the unit along the dotted lines to make a 4.5″ square as shown below.

Step 11:
Remove the template pieces. You will probably need to finger (fingernail) press on the seam lines to get the paper to tear easily.

Step 12:
Here’s a picture of the completed block.

Rulers:
I tried out two different rulers that are made for constructing this block. First we’ll look at Quilt in a Day’s Triangle in a Square Rulers by Eleanor Burns.

The rulers I purchased can make 3″ or 4″ units. The instructions that come with the rulers are very good with lots of illustrations. However, on my copy, the coloring was wrong on the 5″ strips for the 4″ unit – it was correct the rest of the way through the instructions. There is also a pattern included!
Eleanor has you cut 6″ strips to make the side triangle pieces and 5″ strips to make the center triangle pieces. At the end, you will trim up the unit to get the correct size.
Here you can see my finished block:

The second ruler I tried was the Tri Recs Triangle Rulers designed by Darlene Zimmerman and Joy Hoffman with EZ Quilting.

The Tri Recs rulers have markings to make from 1″ to 6″ finished units which is nice to have all those sizes in one set of rulers. The instructions included with the rulers are okay but you’ll need your reading glasses to read them!
Darlene and Joy have you cut strips to the same width as your unfinished block – in my case 4.5″ wide. So there was little waste but also little room for error.
Here’s my finished block. The bottom corners are off a little but that shouldn’t make any difference once they are sewn into a block. I thought I lined everything up right, but maybe not. Also the top edge of the block isn’t quite 4.5″ (I probably took slightly more than 1/4″ seam at the top).
