If you’re looking to add bold visual impact to your next quilt project, the Rose Mosaic quilt block is the perfect choice. Measuring 12″ square and built with a striking combination of triangle-in-a-square units, half-square triangles, and square-in-a-square units, this block offers both structure and drama.
Its geometric intricacy creates a mesmerizing design that comes to life when multiple blocks are sewn together, forming a dynamic quilt full of movement and depth. In this tutorial, we’ll walk step-by-step through the process of piecing the Rose Mosaic block, so you can confidently bring this stunning design to life.
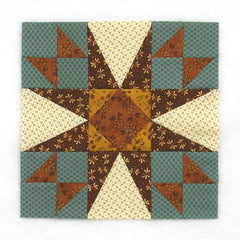
Fabric Requirements for a 12″ Rose Mosaic Quilt Block:
- 4 paper templates (see Step 1)
- Light/Cream: 4 – 5″ squares
- Medium/Gold: 4 – 2.5″ squares
- Medium/Aqua: 4 – 3″ squares, and 8 – 2.5″ squares
- Medium/Brown: 1 – 4.5″ square, and 4 – 3″ squares
- Dark/Brown: 8 – 3″ x 6″ rectangles

Sewing Directions:
Triangle in a Square Units:
Step 1:
To make these units using the paper piecing technique, print out four of the templates (there are two to a page) shown in the fabric requirements picture. Be sure to print them out at 100% size. Here is the link: Triangle in a Square Template

Square in a Square Unit:
Step 2:
Using a Medium/Brown 4.5″ square, and four Medium/Gold 2.5″ squares “snowball” the corners of the Medium/Brown 4.5″ square. I like to work on two opposite corners at a time. Click Square in a Square for a detailed tutorial on making this unit.
- Mark a diagonal line from corner to corner on the back of the 2.5″ squares.
- Sew a 2.5″ square to opposite corners of the Medium/Brown square along the marked line (top left corner). Note the orientation of the marked lines.
- Match the corners of the 2.5″ squares and press (bottom right corner).

Step 3:
- Open up the 2.5″ squares and trim the seam allowances (top left corner).
- Refold (bottom right corner).

Step 4:
Repeat on the remaining two corners of the Medium/Brown square to complete the unit.

Half Square Triangle Units:
Step 5:
Using the four Medium/Aqua 3″ squares and the four Medium/Brown 3″ squares, sew together eight Half Square Triangle units like the ones in the picture below. Press the seam allowances toward the Brown fabric. Trim/square up the units to 2.5″. You can find my tutorial for making basic Half Square Triangles at https://quiltembroiderypdf.com/how-to-sew-a-basic-half-square-triangle-block

Corner Units:
Step 6:
Lay out two Step 5 Half Square Triangle units, and two Medium/Aqua 2.5″ squares as shown in the picture below.

Step 7:
Sew the units into two rows and press the seam allowances away from the Half Square Triangle units.

Step 8:
Sew the two rows together and press the seam allowance. You can see in the picture below that I’ve used the tweak/twirl/furl method but you can press however you prefer.

Step 9:
Repeat Steps 6 through 8 for a total of four Corner units.

Putting It All Together:
Step 10:
Lay out the Triangle in a Square units, the center Square in a Square unit, and the Corner units as shown in the picture below. From here the block goes together like a basic Nine Patch block.

Step 11:
Sew the units into three rows as shown below.

Step 12:
Press the seam allowances toward the Triangle in a Square units as shown in the picture below.

Step 13:
Sew the three rows together to complete the block.

Step 14:
Press the seam allowances toward the center of the block as shown below.

Layout Ideas:
This is a basic 4 x 4 layout using colors similar to the tutorial.

This example uses the same coloring and layout as above but adds in narrow (1″) sashing and cornerstones.

This is the same layout as the first one except that I modified the color placement in the Corner units.

This is an alternating example using a Storm at Sea block as the alternating block.

This is also an alternating layout using a simple chain block for the alternating block. I also put the background fabric in the corners of the Rose Mosaic block.

This is an on-point layout with a flower applique block as an alternating block and the background fabric extending into the setting triangles.

This is another alternating on-point example using the Rose Mosaic and Storm at Sea blocks. I left the corner setting triangles as background fabric.

This on-point version has narrow sashing and cornerstones in a coordinating color and background fabric for the setting triangles.
