Today let’s look at the Wandering Star quilt block. This traditional quilt block is a variation of the Friendship Star block. It’s quick and easy – if you can sew together a Half-Square Triangle, you’re good to go! Let’s get started.
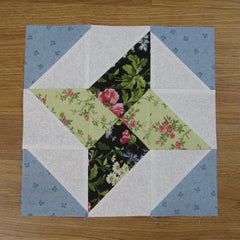
Fabric Requirements for a 12″ Finished Wandering Star Quilt Block:
- Light/White: 4 – 5″ squares
- Medium 1/Green: 1 – 5.5″ square, and 1 – 5″ square
- Medium 2/Blue: 2 – 5″ squares
- Dark/Black: 1 – 5.5″ square, and 1 – 5″ square

Sewing Directions:
Hourglass Unit:
Step 1:
Using the Medium 1/Green 5.5″ square and the Dark/Black 5.5″ square, make an Hourglass (or Quarter-Square Triangle) unit like shown in the picture below. You can find my tutorial for making the Hourglass block at: https://quiltembroiderypdf.com/how-to-sew-a-basic-hourglass-or-quarter-square-triangle-block. I pressed my seam allowances using the tweak/twirl/furl method. Trim/square up the unit to 4.5″ square. You will wind up with two units – use the best and save the other for another project.

Half-Square Triangle Units:
Step 2:
Using the two of the Light/White 5″ squares and the two Medium 2/Blue 5″ squares, make four Half-Square Triangle units as shown in the picture below. You can find my tutorial for making this unit at: https://quiltembroiderypdf.com/how-to-sew-a-basic-half-square-triangle-block. Press the seam allowances toward the Light/White fabric. Trim/square up the units to 4.5″ square.

Step 3:
Using two Light/White 5″ squares and the Medium 1/Green 5″ square and the Dark/Black 5″ square, make four Half-Square Triangle units as shown in the picture below. Press the seam allowances toward the Light/White fabric and trim/square up the units to 4.5″ square.

Putting It All Together:
Step 4:
Lay out the Hourglass unit, and all the Half-Square Triangle units as shown in the picture below. Make sure your star points all twirl the same direction! Now you can sew this Wandering Star block together just like a basic Nine Patch block.

Step 5:
Sew the units together in three rows just like in the picture below.

Step 6:
And press the seam allowances in the top and bottom row toward the outside of the block, and press the middle row seam allowances toward the center of the block. Which you can see in the picture below.

Step 7:
Now you can sew the three rows together – you’re done! Well, except for …

Step 8:
the pressing! I pressed my seam allowances toward the center of the block but you can press in either direction.
