Today let’s look at the traditional quilt block called Castle Tower. I really don’t see a castle tower in the design but the original maker (whoever that might be) must have! The block is pretty easy to do with on two main components. Let’s get started!
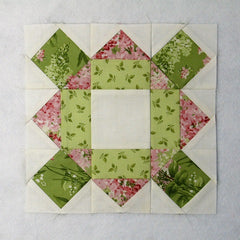
Fabric Requirements for a 9″ Finished Traditional Castle Tower Quilt Block
- Light/White: 1 – 3.5″ square, and 20 – 2″ squares
- Medium/Green: 4 – 2″ x 3.5″ rectangles
- Medium/Pink: 4 – 2″ squares, and 4 – 2″ x 3.5″ rectangles
- Dark/Green: 4 – 3.5″ squares

Sewing Directions:
Square in a Square Units:
Step 1:
Using the 4 Dark/Green 3.5″ squares, 12 of the Light/White 2″ squares, and the 4 Medium/Pink 2″ squares, sew together four Square in a Square units as shown in the picture below. You can find my tutorial for making a basic Square in a Square block at https://quiltembroiderypdf.com/how-to-sew-a-basic-square-in-a-square-block

Flying Geese Units:
Step 2:
Using the 4 Medium/Pink 2″ x 3.5″ rectangles, and the remaining 8 Light/White 2″ squares, make four Flying Geese units like shown in the picture below. My tutorial showing my (easy) method for making Flying Geese blocks is at https://quiltembroiderypdf.com/how-to-sew-a-basic-flying-geese-block

Step 3:
Sew together one of the Step 2 Flying Geese units with a Medium/Green 2″ x 3.5″ rectangle as shown in the picture below. Press the seam allowance away from the Flying Geese unit. Repeat for a total of four units.

Putting It All Together:
Step 4:
Now all you need to do is sew the units together like you would a typical Nine Patch block.
Lay out the Light/White 3.5″ square, the four Square in a Square units, and the four Step 3 units as shown in the picture below.

Step 5:
Sew the units together into three rows as you can see in the picture below.

Step 6:
Press the seam allowances toward the Square in a Square units as shown below.

Step 7:
Now you can sew the three rows together and you’re done!

Step 8:
Well, you still need to press it! Press the seam allowances toward the center of the block as shown in the picture below.

Layout Ideas:


