Today we’re going to put together a traditional Pinwheel Star Quilt Block! It starts out with an on-point pinwheel quilt block, add some triangles and finish with Flying Geese units. It’s lovely block – let’s get started!
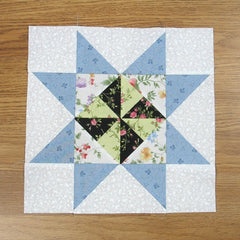
Fabric Requirements for a 12″ Pinwheel Star Quilt Block:
- Light/White: 4 – 3.5″ x 6.5″ rectangles, and 4 – 3.5″ squares
- Light Print: 2 – 3+7/8″ squares, cut in half diagonally once for a total of 4 medium triangles
- Medium/Green: 1 – 4.25″ square, cut in half diagonally twice for a total of 4 small triangles
- Medium/Blue: 8 – 3.5″ squares
- Dark/Black Print: 1 – 4.25″ square, cut in half diagonally twice for a total of 4 small triangles

Pinwheel Center Unit:
Step 1:
Sew together one of the Medium/Green small triangles and one of the Dark/Black Print small triangles along a short side as shown in the picture below.

Step 2:
Press the seam allowance toward the Dark/Black Print as shown below. Repeat Steps 1 and 2 for a total of 4 units.

Step 3:
Using the picture below as a reference, sew a Light Print medium triangle to the Step 2 unit along the long side.

Step 4:
And press the seam allowance toward the Light Print fabric as you can see in the picture below. I recommend trimming up the blocks (which I didn’t do) to get rid of the little dog ears and make the unit less bulky and neater. Unit should measure 3.5″ square. Definitely a do as I say not as I do moment! Repeat Steps 3 and 4 for a total of four units.

Step 5:
Using the picture below as a reference, lay out the four Step 4 units and sew together in two rows (or columns as seen here).

Step 6:
Press the seam allowances in opposite directions as shown in the picture below so that the seams will nest nicely.

Step 7:
Sew the two rows (columns) together and you have the center pinwheel unit done!

Step 8:
Press the seam allowance. In the picture below I’ve used the tweak/twirl/furl method but it’s hard to see because I didn’t trim up those units at the start!

Flying Geese Units:
Step 9:
Using the Light/White 3.5″ x 6.5″ rectangles and the Medium/Blue 3.5″ squares, make four Flying Geese units as shown in the picture below. You can find my tutorial for making Flying Geese units at: https://quiltembroiderypdf.com/how-to-sew-a-basic-flying-geese-block

Putting It All Together:
Step 10:
Using the picture below as a reference, lay out the Pinwheel Center Unit, the four Flying Geese units, and the four Light/White 3.5″ squares.

Step 11:
Sew the units together in three rows as shown in the picture below.

Step 12:
And press the seam allowances toward the Flying Geese units as you can see in the picture below.

Step 13:
Now you can sew the three rows together to complete the block!

Step 14:
Press the seam allowances away from the center as shown in the picture below.The Pinwheel Star quilt block should measure 12.5″ square (12″ finished).

Layout Ideas:


In Conclusion:
I like the look of this Pinwheel Star quilt block – the on-point pinwheel in the center makes a nice focal point. I should have trimmed the four little units that make up the center so that the block would lay flatter, etc.
However, I do think there is an easier way (although more fabric is wasted) to put this block together and so I’ll be doing a tutorial on that method in the future (if it works out like I think it will).
I hope you enjoyed this tutorial. If you like this tutorial and want to see more, simply click HERE to receive a free PDF quilt pattern called “Chained Weathervane” and sign up for my newsletter.
Happy Quilting!
Elaine
P.S. Looking for more star blocks? Take a look at these tutorials: https://quiltembroiderypdf.com/tagged/eight-pointed-star-blocks
P.P.S. Check out my Etsy shop at https://www.etsy.com/shop/fabric406