Looking for a fun and easy quilt block that’s perfect for busting through your scrap stash? The Spool quilt block (or Spools quilt block) is a delightful 12″ design that combines charm and simplicity. This beginner-friendly block uses only squares and rectangles, making it approachable for quilters of all skill levels. Snowballed corners easily create the diagonal lines and fewer seams.
Whether you’re creating a scrappy masterpiece or working with a coordinated palette, the Spool block is a wonderful way to showcase your favorite fabrics. Let’s dive in and start stitching!
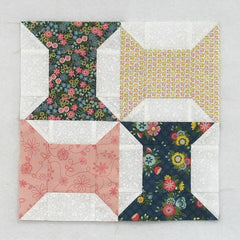
Fabric Requirements for a 12″ Finished Spool Quilt Block:
- Light/White: 8 – 2″ x 3.5″ rectangles, and 16 – 2″ squares
- Assorted Prints: From EACH of four colors: 2 – 2″ x 6.5″ rectangles, and 1 – 3.5″ square

Sewing Directions:
Snowballed Rectangle Units:
Step 1:
Using an Assorted Prints 2″ x 6.5″ rectangle and two Light/White 2″ squares sew together a unit as follows:
- Mark a diagonal line from corner to corner on the back of the Light/White 2″ squares.
- Sew a Light/White 2″ square to the Assorted Print rectangle along the marked line (top left image). Note the orientation of the marked line.
- Match the corners of the Light/White square and press (top right image).
- Open the small square up and trim the seam allowance (bottom left image).
- Refold (bottom right image).
(This is the same method I use for making Flying Geese units except that the rectangle is longer.)

Step 2:
Repeat Step 1 for a total of two Snowballed Rectangle units like the ones in the picture below.

Middle Unit:
Step 3:
Sew two Light/White 2″ x 3.5″ rectangles to opposite sides of an Assorted Prints 3.5″ square as shown below. Use the same Assorted Prints color as in Steps 1 and 2.

Step 4:
Press the seam allowances away from the Light/White fabric as shown below.

Corner Unit:
Step 5:
Lay out the Steps 2 and 4 units in three rows as depicted in the picture below.

Step 6:
Sew the three rows together.

Step 7:
Press the seam allowances toward the Middle unit as shown in the picture below.

Step 8:
Repeat Steps 1 through 7 for each of the remaining Assorted Prints. You will have four Corner units similar to the ones in the picture below.

Putting It All Together:
Step 9:
Lay out the four Corner units as shown below. From here the block sews together like a basic Four Patch block.

Step 10:
Sew the units into two rows.

Step 11:
Press the seam allowances toward the Assorted Prints fabric as in the picture below.

Step 12:
Sew the two rows together and…

Step 13:
Press the seam allowance. I recommend using the tweak/twirl/furl method of pressing so that your seams will nest together when sewing multiple blocks together. It also helps the block to lay flatter. You’re done – quick and easy!

Layout Ideas:
Here’s the basic 4 x 4 layout using colors similar to the tutorial.

This is the same layout only each block is colored differently. Good use of scraps!

This example has sashing and cornerstones added to the basic 4 x 4 layout.

Little Spool, big Spool alternating layout. Makes an interesting design.

This is an on-point layout with a simple chain block used for an alternating block and plain background fabric for the setting triangles. I really like this layout – it looks more playful!

Here’s another on-point layout that uses scrappy blocks and a blue fabric for the sashing, cornerstones, and setting triangles.
