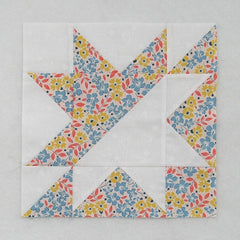
Welcome to this fun and versatile tutorial for the Split Star quilt block! In this guide, I’ll walk you through creating this beautiful block in two different sizes (12″ and 8″) and with two construction methods (Flying Geese or Half-Square Triangles (HSTs)).
The Split Star is a traditional quilt block that can be made scrappy or in a coordinated color palette, making it perfect for any stash. When you sew multiple blocks together, you’ll love the secondary designs that emerge, adding even more depth and visual interest to your quilt! Let’s dive in and get started!
If you would like a printable PDF download of this tutorial, you can buy it in my Etsy shop. This is totally optional.

Split Star Fabric Requirements for Flying Geese Method:
12″ Finished:
- Light: 1 – 7″ square, 1 – 4″ square, 5 – 3.5″ squares, and 2 – 3.5″ x 6.5″ rectangles
- Dark: 1 – 7″ square, 1 – 4″ square, 5 – 3.5″ squares, and 2 – 3.5″ x 6.5″ rectangles
8″ Finished:
- Light: 1 – 5″ square, 1 – 3″ square, 5 – 2.5″ squares, and 2 – 2.5″ x 4.5″ rectangles
- Dark: 1 – 5″ square, 1 – 3″ square, 5 – 2.5″ squares, and 2 – 2.5″ x 4.5″ rectangles

Sewing Directions:
Directions are given using the 12″ Finished Size.
Half Square Triangle Units:
Step 1:
Using the Light and Dark 7″ squares, sew together a large Half Square Triangle (HST) unit like the one in the picture below. Trim/square up the unit to 6.5″ square (4.5″ square for the 8″ block). You will wind up with two units, but you only need one per block. You can find a detailed tutorial for sewing Half Square Triangles (HST) at https://quiltembroiderypdf.com/how-to-sew-a-basic-half-square-triangle-block

Step 2:
Using the Light and Dark 4″ squares, repeat Step 1. Trim/square up the units to 3.5″ square (2.5″ square for the 8″ block). You will use both small HST units.

Flying Geese Units:
Step 3:
Using four Light 3.5″ squares and two Dark 3.5″ x 6.5″ rectangles, sew together two Flying Geese units as shown in the picture below. For a detailed tutorial of my no-trim method for making perfect Flying Geese blocks check out https://quiltembroiderypdf.com/how-to-sew-a-basic-flying-geese-block.

Because this is a larger size unit, I also sewed another seam about 1/2″ away from the marked line so I can get a bonus half square triangle to use in another project!

Step 4:
Repeat Step 3 only using the four Dark 3.5″ squares and two Light 3.5″ x 6.5″ rectangles.

Putting It All Together:
Step 5:
Lay out the Half Square Triangle units, the Flying Geese units, the Light 3.5″ square, and the Dark 3.5″ square as shown in the picture below. From here the block goes together like a basic uneven Nine Patch block.

Step 6:
Sew the units into three rows.

Step 7:
Press the seam allowances away from the Flying Geese units as shown below.

Step 8:
Sew the three rows together to complete the block.

Step 9:
Press the seam allowances toward the center of the block as shown in the picture below.
