The Split Nine Patch Variation is a simple yet versatile quilt block that’s perfect for beginners and scrap lovers alike! This classic design combines the ease of a traditional Nine Patch with a touch of extra movement, making it a great choice for playing with color and contrast.
Whether you prefer a scrappy, anything-goes look or a carefully planned palette, this block comes together quickly and offers endless layout possibilities—think zigzags, diamonds, barn-raising, or even a bold modern twist. Grab your favorite fabric scraps, and let’s get started!
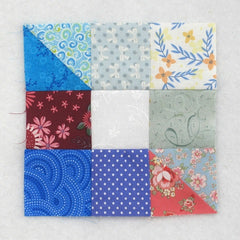
Fabric Requirements for a 6″ Finished Split Nine Patch Variation Quilt Block:
- White: 1 – 2.5″ square
- Assorted Light Prints: 3 – 2.5″ squares
- Assorted Dark Prints: 3 – 2.5″ squares
- Light/Dark Half Square Triangles: 2 – 2.5″ square
- (To make the Half Square Triangles you will need 1 Light and 1 Dark 3″ square.)

Sewing Directions:
Half Square Triangles:
Step 1:
- You will need two Light/Dark Half Square Triangles (HST) for this block.
- You can find my tutorial for making HST units at https://quiltembroiderypdf.com/how-to-sew-a-basic-half-square-triangle-block
- Because this is a scrappy block, it is better to use different color HSTs within the same block. So make several of them to mix and match!
- Trim/square up the HSTs to 2.5″ square.

Putting It All Together:
Step 2:
Arrange the two Half Square Triangle units, the White 2.5″ square, and the Assorted Prints 2.5″ squares as shown in the picture below. Note that the Lights are on one side and the Darks on the other with the White square in the center.

Step 3:
Sew the units into three rows as shown.

Step 4:
Press the seam allowances in the top and bottom row toward the center and the middle row away from the White square as you can see in the picture below.

Step 5:
Sew the three rows together.

Step 6:
Press the seam allowances away from the center of the block. Easy, peasy!

Layout Ideas:
I went ahead and made four Split Nine Patch Variation blocks so I could get an idea of what they look like together.
This picture below shows a layout that creates a block similar to the Grandmother’s Own block – only scrappy. This is what I was aiming for and I think it works.

Here’s an illustration showing a 6 x 6 layout of the above.

And this layout would create a diagonal stripe design.

Here’s an illustration showing a 6 x 6 layout of the above.

And here is what a “barn raising” layout could look like.

Of course you don’t have to make it scrappy as the picture below shows. However, it might be easier just to make a Grandmother’s Own block.
