Here’s an easy block to make for a Valentine’s Day project – directions include fabric requirements for two sizes of block – 9″ and 12″. So dig into your scrap stash and let’s get to piecing!
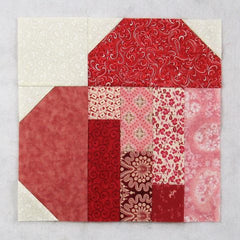

Fabric Requirements for a 12″ Finished Scrappy Heart Quilt Block:
- Light/Ivory: 1 – 4.5″ square, and 4 – 2.5″ squares
- Assorted Prints: 2 – 4.5″ x 8.5″ rectangles, 2 – 2.5″ squares, 2 – 2.5″ x 4.5″ rectangles, 2 – 2.5″ x 6.5″ rectangles, and 1 – 2.5″ x 8.5″ rectangle
Fabric Requirements for a 9″ Finished Block:
- Light/Ivory: 1 – 3.5″ square, and 4 – 2″ squares
- Assorted Prints: 2 – 3.5″ x 6.5″ rectangles, 2 – 2″ squares, 2 – 2″ x 3.5″ rectangles, 2 – 2″ x 5″ rectangles, and 1 – 2″ x 6.5″ rectangle

Sewing Directions:
Directions are given for the 12″ block.
Snowball Units:
Step 1:
“Snowball” two corners of the two 4.5″ x 8.5″ rectangles using the four Light/Ivory 2.5″ squares as shown in the picture below. You can find the tutorial for making a basic Snowball block at https://quiltembroiderypdf.com/how-to-sew-a-basic-snowball-block

Square Unit:
Step 2:
Match up the Assorted Prints 2.5″ squares, 2.5″ x 4.5″ rectangles, and 2.5″ x 6.5″ rectangles as shown below.

Step 3:
Sew the patches into three strips as shown in the picture below.

Step 4:
Press the seam allowances. As you can see, I’ve pressed toward the darker fabric but you can press whichever direction you desire.

Step 5:
Lay out the Step 4 strips and the Assorted Prints 2.5″ x 8.5″ rectangle as shown in the picture below.

Step 6:
Sew the strips together as shown.

Step 7:
Press the seam allowances however you wish. I’ve pressed mine all in the same direction.

Putting It All Together:
Step 8:
Lay out the Step 1 units, the Step 7 unit, and the Light/Ivory 4.5″ square as shown below.

Step 9:
Sew the units into two rows and…

Step 10:
Press the seam allowances in opposite directions so that the seams will nest nicely when making the final seam.

Step 11:
Sew the two rows together…

Step 12:
And press the seam allowance away from the Step 7 Square unit as shown in the picture below. That’s all!

Layout Options:
Here is an on point layout with blank blocks in between the heart blocks. I added a bottom border to even out the placement of the hearts. This is a great layout for some fancy quilting in those blank blocks!

Here’s another on point layout using sashing and cornerstones. Again I added a bottom border to even things out.

Here’s a layout for a small table topper or wall hanging. If you don’t put the sashing and cornerstone in, it looks like a big flower! Cute!
