Today let’s sew together a Ribbon Star quilt block. There are a couple of other blocks that go by the same name but this is the one that first appeared in the Ladies Art Company publication. Traditionally, this block is done with only one color and the background but I had to put my own spin on it. The Ribbon Star is an easy block with only Half Square Triangles and squares. Let’s get started!
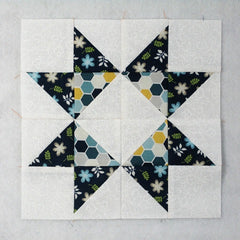
Fabric Requirements for an 8″ Finished Ribbon Star Quilt Block:
- Light/White: 6 – 3″ squares, and 4 – 2.5″ squares
- Medium/Hexies: 2 – 3″ squares
- Dark/Navy: 4 – 3″ squares

Sewing Directions:
Half Square Triangle Units (HST):
Step 1:
Using two of the Light/White 3″ squares and the Medium/Hexie 3″ squares, sew together four Half Square Triangle (HST) units. Press the seam allowance toward the Light/White fabric as shown in the picture below. Trim the units to 2.5″ square. You can find my tutorial for making the Half Square Triangle at https://quiltembroiderypdf.com/how-to-sew-a-basic-half-square-triangle-block

Step 2:
Using the rest of the Light/White 3″ squares and the Dark/Navy 3″ squares repeat Step 1 – only press the seam allowances toward the Dark/Navy fabric as shown below. You will have eight HSTs (sorry for the picture only showing six).

Corner Unit:
Step 3:
Lay out one Light/White 2.5″ square, two of the Step 2 HSTs, and one of the Step 1 HSTs as shown in the picture below.

Step 4:
The patches now get sewn together just like a basic Four Patch block. Sew the patches into two rows and press the seam allowances away from the Dark/Navy fabric as shown below.

Step 5:
Now you can sew the two rows together and press the seam allowances. You can see from the picture below that I’ve used the tweak/twirl/furl method for pressing. Repeat Steps 3 through 5 for a total of four Corner units.

Putting It All Together:
Step 6:
Now you can lay out the four Corner units as shown below.

Step 7:
And once again sew the units together just like a basic Four Patch – sew the units into two rows as shown below.

Step 8:
And press the seam allowances in opposite directions.

Step 9:
Sew those two rows together and you’re done!

Step 10:
Well, except for the pressing. You can see in the picture below that once again I’ve used the tweak/twirl/furl method for pressing.

Layout Ideas:


