Today let’s learn how to piece this 12″ Prairie Queen quilt block! The Prairie Queen block also appeared in the Hearth & Home publication under the name True Blue. Since I’m a prairie girl, I like the Prairie Queen name!
The Prairie Queen quilt block is easy to put together – you just need to pay attention to the orientation of the little four-patch units. This is so you get a nice little checker board pattern when you sew the blocks together.
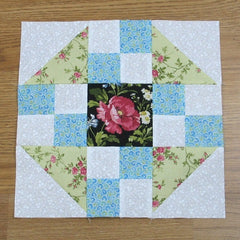
Fabric Requirements for a 12″ Finished Prairie Queen Quilt Block:
- Light/White: 8 – 2.5″ squares, and 2 – 5″ squares
- Medium/Dark 1 (Green): 2 – 5″ squares
- Medium/Dark 2 (Blue): 8 – 2.5″ squares
- Medium/Dark 3 (Black): 1 – 4.5″ square

Sewing Directions:
Step 1:
Half-Square Triangle Units:
First you will need to make four Half-Square Triangle (HST) units using the Light/White and Medium/Dark 1 (Green) 5″ squares. You can find my tutorial on HSTs here: https://fabric-406.myshopify.com/blogs/fabric406-blog/how-to-sew-a-basic-half-square-triangle-block

Step 2:
Four-Patch Units:
Next you need to sew together 4 four-patch units using the Light/White 2.5″ squares and the Medium/Dark 2 (Blue) 2.5″ squares. I chose to use the tweak/twirl/furl method for pressing the seam allowances. You can see my tutorial on the four-patch block at: https://fabric-406.myshopify.com/blogs/fabric406-blog/how-to-sew-a-basic-four-patch-quilt-block

Putting It All Together:
Step 3:
Lay out the HST units, the four-patch units, and the Medium/Dark 3 (Black) 4.5″ square as shown in the picture. Make sure you get the orientation of the four-patch units right so you will get a checkerboard pattern when sewing blocks together.

Step 4:
Sew the units together in 3 rows and ….

Step 5:
Press the seam allowances toward the four-patch units as shown the picture below.

Step 6:
Sew the rows together – all done! Quick and easy!

Step 7:
Almost done anyway – press the seam allowances toward the outside of the block as shown below. Now you’re done!

Layout Ideas:
Here is the basic 4 x 4 layout using colors similar to the tutorial.


