Looking for a fast, easy quilt block with classic charm? The Odds and Ends block is a traditional favorite with a clever twist—it has built-in sashing and creates a striking star design when multiple blocks are joined. It was first published by the Ladies Art Company.
This block is beginner-friendly and quick to piece (only half square triangles, rectangles and squares), making it a perfect block to add to your collection of quick quilt ideas. In this tutorial, I’ll include cutting instructions for both 12″ and 6″ finished blocks, so you can choose the size that suits your project. Let’s dive in!
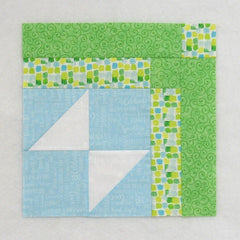
Fabric Requirements for the Odds and Ends Quilt Block:
12″ Finished Size:
- Light/White: 1 – 5″ square
- Medium/Blue: 1 – 5″ square, and 2 – 4.5″ squares
- Medium/Print: 2 – 2.5″ x 8.5″ rectangles, and 1 – 2.5″ square
- Dark/Green: 2 – 2.5″ x 10.5″ rectangles, and 1 – 2.5″ square
6″ Finished Size:
- Light/White: 1 – 3″ square
- Medium/Blue: 1 – 3″ square, and 2 – 2.5″ squares
- Medium/Print: 2 – 1.5″ x 4.5″ rectangles, and 1 – 1.5″ square
- Dark/Green: 2 – 1.5″ x 5.5″ rectangles, and 1 – 1.5″ square

Sewing Directions:
The following instructions are for the 12″ finished size of block. I’ve included trim/square up sizes for the 6″ block in paretheses.
Half Square Triangles:
Step 1:
- Using the Light/White 5″ square and the Medium/Blue 5″ square, sew together two Half Square Triangles like the ones in the picture below.
- Square up/trim the units to 4.5″ square (2.5″ square for the 6″ block).
- You can find my tutorial for making HST units at https://quiltembroiderypdf.com/how-to-sew-a-basic-half-square-triangle-block

Four Patch Unit:
Step 2:
Lay out the Step 1 Half Square Triangles and the two Medium/Blue 4.5″ squares as shown below. From here the block goes together like a basic Four Patch block.

Step 3:
Sew the patches into two rows.

Step 4:
Press the seam allowances toward the Medium/Blue squares as shown in the picture below.

Step 5:
Sew the two rows together to complete the Four Patch unit. Unit should measure 8.5″ (4.5″) square.

Step 6:
Press the seam allowance. As you can see below, I’ve pressed using the tweak/twirl/furl method. This will make the unit lay flatter.

Putting It All Together:
Step 7:
Lay out the Four Patch unit, the two Medium/Print 2.5″ x 8.5″ rectangles, and the Dark/Green 2.5″ square as shown in the picture below.

Step 8:
Sew the units into two rows.

Step 9:
Press the seam allowances toward the rectangle units as shown in the picture below.

Step 10:
Sew the two rows together and press the seam allowance away from the Four Patch unit (oops – I forgot to take a picture of the back of the block).

Step 11:
Lay out the Step 10 unit, the two Dark/Green 2.5″ x 10.5″ rectangles, and the Medium/Print 2.5″ square as shown in the picture below.

Step 12:
Repeat Steps 8 through 10 to complete the block.

Step 13:
In the picture below you can see that I’ve pressed the seam allowances toward the outside of the block.

Layout Ideas:
This is the basic 4 x 4 layout with similar colors to the tutorial. I would suggest adding a left and bottom border to match the top and right sides of the quilt.

Rotating blocks in the previous layout shows the magic of this block by creating a star design.

This example is the same layout as above but with sashing and cornerstones added. You still see the star but there’s more geometric design. You could make a large star block out of four blocks and then add the sashing between those large blocks.

This layout uses a scrappy block for a different look.

This design rotates the blocks differently so that the geometric sashing shines.

This is the only on-point example I came up with that looked nice. It definitely has a modern feel to it.
