Learn how to make the Triple Irish Chain quilt blocks with this easy step-by-step tutorial! Each block finishes at a generous 14″ and creates a bold, interlocking chain design that looks impressively complex but comes together with simple rectangle and square units. Whether you go scrappy to use up your stash or opt for planned color placement for a more graphic look, this classic pattern delivers striking results every time.
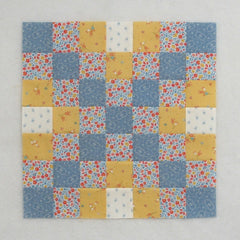

Fabric Requirements for a 14″ Triple Irish Chain Main Quilt Block:
- Light/White: 4 – 2.5″ squares
- Medium/Gold: 12 – 2.5″ squares
- Medium/Pink: 20 – 2.5″ squares
- Dark/Blue: 13 – 2.5″ squares

Fabric Requirements for a 14″ Triple Irish Chain Alternating Block:
- Light/White: 1 – 6.5″ square, 4 – 4.5″ x 6.5″ rectangles, and 4 – 2.5″ squares (optionally, you can substitute the 6.5″ square and 2 of the 4.5″ x 6.5″ rectangles for 1 – 6.5″ x 14.5″ rectangle)
- Medium/Gold: 8 – 2.5″ squares
- Medium/Pink: 4 – 2.5″ square

Sewing Directions for the Main Block:
Step 1:
Lay out all the 2.5″ squares as shown in the picture below:

Step 2:
Sew the squares into seven rows as shown below.

Step 3:
Press the seam allowances in opposite directions from row to row. So rows 1, 3, 5 and 7 go in one direction and rows 2, 4 and 6 go in the opposite direction as shown in the picture below.

Step 4:
Sew the seven rows together as shown below.

Step 5:
Press the seam allowances. As you can see in the picture below, I’ve pressed mine all in one direction but you can press however you wish.

Sewing Directions for Alternating Block:
Four Patch Units:
Step 6:
Lay out one Light/White 2.5″ square, two Medium/Gold 2.5″ squares, and one Medium/Pink 2.5″ square as shown in the picture below.

Step 7:
- Sew the squares into two rows (upper left image)
- Press the seam allowances toward the Medium/Gold squares (upper right image)
- Sew the two rows together (lower left image)
- Press the seam allowances (lower right image) As you can see, I pressed the seam allowance using the tweak/twirl/furl method but you can press however you wish
- You can find a detailed tutorial for making Four Patch units at https://quiltembroiderypdf.com/how-to-sew-a-basic-four-patch-quilt-block

Step 8:
Repeat Steps 6 and 7 for a total of 4 Four Patch units like the ones in the picture below.

Step 9:
Lay out the Step 8 units, the Light/White 6.5″ square, and the four Light/White 4.5″ x 6.5″ rectangles as shown in the picture below. If you have opted to combine the 6.5″ square and two of the 4.5″ x 6.5″ rectangles into one 6.5″ x 14.5″ rectangle, place that large rectangle in the center row of this layout.

Step 10:
Sew the units into three rows as shown in the picture below.

Step 11:
Press the seam allowances toward the 4.5″ x 6.5″ rectangles as shown below.

Step 12:
Sew the three rows together.

Step 13:
Press the seam allowances toward the center of the block.

Layout Ideas:
This is the typical layout using both blocks in an alternating design with colors similar to the tutorial.

Just for fun this layout uses just the main block. You still get a chain pattern but it is quite a bit different.

The color placement on this typical layout is different than the tutorial. The dark color frames the open diamond shape.

And here I’ve substituted the light fabric with black for a very dramatic look.

How about a scrappy quilt? This would be a great quilt to use up any random 2.5″ squares you have.

You can even substitute the 6.5″ square in the alternating block with a colored square or maybe a fussy cut square.

This is an on-point layout where the blocks extend into the setting triangles.
