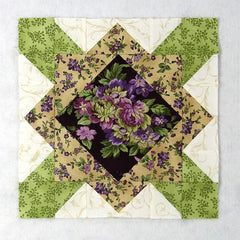
The Joyce’s Mystery quilt block is a traditional design with a touch of intrigue, thanks to its striking central square-in-a-square unit—perfect for showcasing a favorite fussy cut. This 12″ block comes together with flying geese, half-square triangles, and simple squares, and it really shines when set into a quilt. When multiple blocks are sewn together, they reveal a bold star design that adds a dynamic secondary pattern to your finished project. Whether you’re making a sampler or planning a full quilt layout, this block offers plenty of possibilities.
Traditionally, this block has a light center with a dark frame around it but I wanted to see what it looked like with a fussy cut piece in the center. So I dug into my scraps and found this large floral on a dark purple background and put a lighter frame around that – what a difference! Anyway, let’s get started!
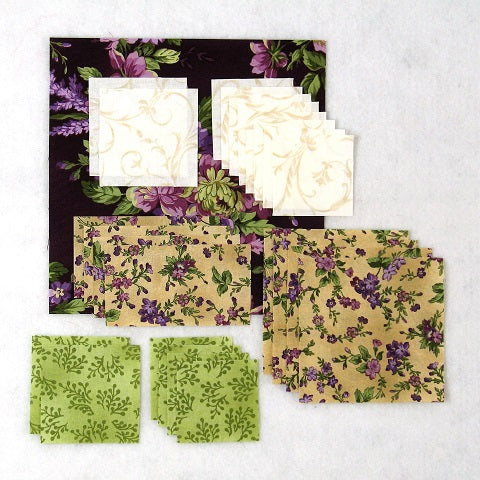
Fabric Requirements for a 12″ Finished Joyce’s Mystery Quilt Block:
- Light/Ivory: 4 – 3″ squares (I know I only have 2 in the picture – I guess I can’t count!), and 8 – 2.5″ squares
- Medium/Tan: 4 – 4.5″ squares, and 4 – 2.5″ x 4.5″ rectangles
- Medium/Green: 4 – 3″ squares (once again I counted wrong), and 4 – 2.5″ squares
- Dark/Purple: 1 – 8.5″ square
Sewing Directions:
Center Square in a Square Unit:
Step 1:
Using the Dark/Purple 8.5″ square and the four Medium/Tan 4.5″ squares, sew together a Square in a Square unit as shown in the picture below. You can find the tutorial for making a basic Square in a Square block at https://quiltembroiderypdf.com/how-to-sew-a-basic-square-in-a-square-block

Since this unit is so big, when sewing the Medium/Tan squares to the Dark/Purple square, I ran a second line of stitching about 1/2″ from the first stitching. I then cut between the two stitching lines and now have four bonus Half Square Triangle units to use another day. You can see what I did in the picture below.

Half Square Triangle Units:
Step 2:
Using the four Light/Ivory 3″ squares and the four Medium/Green 3″ squares, you next will sew together eight Half Square Triangle units as shown below. You will find a tutorial for sewing a Half Square Triangle at https://quiltembroiderypdf.com/how-to-sew-a-basic-half-square-triangle-block. Press the seam allowances toward the Medium/Green fabric. Trim the units to 2.5″ square.

Flying Geese Units:
Step 3:
The last components you will need are four Flying Geese units. Using the Medium/Tan 2.5″ x 4.5″ rectangles and the Light/Ivory 2.5″ squares, sew together four Flying Geese units as shown in the picture below. A Flying Geese tutorial can be found at https://quiltembroiderypdf.com/how-to-sew-a-basic-flying-geese-block.

Step 4:
Using the picture below for a reference, lay out a Step 3 Flying Geese unit and two Step 2 Half Square Triangle units (top example). Sew the units together (middle example) and press the seam allowances sway from the Flying Geese unit (bottom example). Repeat for a total of four units.

Putting It All Together:
Step 5:
Lay out the Center Unit, the Step 4 units, and the four Medium/Green 2.5″ squares according to the picture below.

Step 6:
Sew the units together in three rows as shown below.

Step 7:
Press the seam allowances in the top and bottom rows toward the Medium/Green 2.5″ squares and the middle row toward the center as shown below.

Step 8:
Now you can sew the three rows together, and…

Step 9:
Press the seam allowances toward the center as shown in the picture below. You’re done!

Layout Ideas:


