Skip to content

Indian Puzzle Quilt Block Free Tutorial

    The Indian Puzzle quilt block is a striking traditional design that offers endless creative possibilities. Made with classic units like flying geese, half-square triangles, and simple squares, this 3-color block combines familiar techniques in a dynamic layout.

    What truly sets the Indian Puzzle apart is how dramatically its look can change depending on your choice of color values and placement. Whether you’re aiming for bold contrast or subtle harmony, this block is a perfect canvas for exploring color play and adding movement to your quilt.
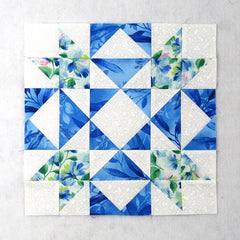
    indian puzzle quilt block

    Fabric Requirements for a 12″ Finished Indian Puzzle Quilt Block:

    • Light/White: 1 – 4.5″ square, 4 – 2.5″ x 4.5″ rectangles, 4 – 3″ squares, and 12 – 2.5″ squares
    • Medium/Blue Floral: 4 – 3″ squares, and 4 – 2.5″ squares
    • Dark/Blue: 4 – 2.5″ x 4.5″ rectangles, and 12 – 2.5″ squares
    indian puzzle fabric requirements

    Sewing Directions:

    Square in a Square Unit:

    Step 1:

    Using the Light/White 4.5″ square and four of the Dark/Blue 2.5″ squares, sew together a Square in a Square unit as shown in the picture below. You will find my tutorial for making a Square in a Square unit at https://quiltembroiderypdf.com/how-to-sew-a-basic-square-in-a-square-block
    indian puzzle 1

    Flying Geese Units:

    Step 2:

    Next you can sew together four Flying Geese units like the ones below using the four Light/White 2.5″ x 4.5″ rectangles, and eight Dark/Blue 2.5″ squares. You can find my tutorial for making a basic Flying Geese block at https://quiltembroiderypdf.com/how-to-sew-a-basic-flying-geese-block
    indian puzzle 2

    Step 3:

    Using the four Dark/Blue 2.5″ x 4.5″ rectangles and eight Light/White 2.5″ squares, sew together four Flying Geese units as shown in the picture below.
     
    indian puzzle 3

    Step 4:

    Pair up one Step 2 Flying Geese unit with one Step 3 Flying Geese unit as shown below.
    indian puzzle 4

    Step 5:

    Sew the two units together and press the seam allowance toward the dark fabric as shown in the picture below. Repeat Steps 4 and 5 for a total of four Flying Geese Units.
    indian puzzle 5

    newsletter signup

    Corner Units:

    Step 6:

    Using the Light/White 3″ squares and the Medium/Blue Floral 3″ squares, sew together eight Half Square Triangles as shown in the picture below. Trim/square up the Half Square Triangle units to 2.5″. You can find my tutorial for making a basic Half Square Triangle block at https://quiltembroiderypdf.com/how-to-sew-a-basic-half-square-triangle-block
     
    indian puzzle 6

    Step 7:

    Lay out two of the Step 6 Half Square Triangle units, one Light/White 2.5″ square, and one Medium/Blue Floral 2.5″ square as shown in the picture below.
     
    indian puzzle 7

    Step 8:

    Now you can sew the patches together just like a Four Patch block. First, sew them into two rows and press the seam allowances toward the Half Square Triangle units as shown in the picture below.
     
    indian puzzle 8

    Step 9:

    Then sew the two rows together and press the seam allowance away from the Medium/Blue Floral fabric as shown below. Repeat Steps 7 through 9 for a total of four Corner units.
     
    indian puzzle 9

    Putting It All Together:

    Step 10:

    From here the Indian Puzzle block goes together just like a Nine Patch block. Lay out the Square in a Square unit, the Flying Geese units, and the Corner units as shown in the picture below.
     
    indian puzzle 10

    Step 11:

    Sew the units together into three rows as shown below.
     
    indian puzzle 11

    Step 12:

    And press the seam allowances toward the Flying Geese units.
     
    indian puzzle 12

    Step 13:

    Sew the three rows together and…
     
    indian puzzle 13

    Step 14:

    Press the seam allowances away from the center of the block as shown below. You’re done!
     
    indian puzzle 14

    Layout Options:

    This one is the block as I’ve shown in the tutorial in a basic 4 x 4 layout.

    quilt 1

    Here’s the same layout as above but with dark sashing and light cornerstones added.

    This one is fun – all the dark fabrics are toward the center and create a star design, and the light fabrics outline the star. 

    quilt 3
     

    For this one I added in another color. All sorts of secondary designs start showing up!

    quilt 4
     

    And here’s the block alternating with a simple chain block for another look:

    quilt 5
     

    Then you have all the possibilities of putting the block on point. Here’s one example with the block alternating with an Hourglass block:

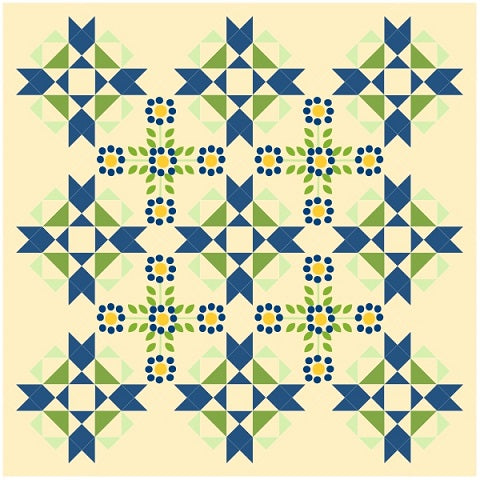
    quilt 6
     
    Here’s another on-point example with an alternating applique block and plain setting triangles.
     
    quilt 7
    This on-point version has coordinating sashing and cornerstones with plain setting triangles. I also changed up the color value in the block.