Quilting enthusiasts, get ready to add a timeless charm to your next project with the versatile, quick and easy 7-Grid Chain Quilt Block! With its straightforward beginner-friendly construction and myriad color variations, this block serves as a cornerstone for stunning quilt compositions.
Whether used as an alternating block or showcased independently, its adaptability shines and its compatibility with block sizes divisible by seven ensures a harmonious cohesion in your quilt layout. From quick-sew projects to intricate designs, this block effortlessly weaves together tradition and innovation, inviting quilters to explore endless avenues of expression. Let’s jump in and start sewing!
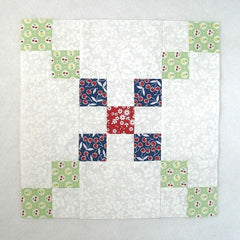
Fabric Requirements for a 14″ Finished 7-Grid Chain Quilt Block:
- Light/White: 4 – 4.5″ x 6.5″ rectangles, and 12 – 2.5″ squares
- Medium/Green: 8 – 2.5″ squares
- Dark/Blue: 4 – 2.5″ squares
- Dark/Red: 1 – 2.5″ squares

Sewing Directions:
Four-Patch Units:
Step 1:
Using the eight Light/White 2.5″ squares and the eight Medium/Green 2.5″ squares, sew together four Four Patch units.
In the picture below you can see the basic steps of construction:
- Lay out two squares of each color and sew into two rows.
- Press the seam allowances toward the Medium/Green fabric.
- Sew the two rows together.
- Press the seam allowances. I’ve used the tweak/twirl/furl method of pressing but you can press however you wish.
For a detailed tutorial on making Four Patch blocks in several different ways, check out this post: https://quiltembroiderypdf.com/how-to-sew-a-basic-four-patch-quilt-block

Step 2:
Repeat Step 1 for a total of four Four-Patch units.

Center Unit:
Step 3:
Layout the remaining Light/White 2.5″ squares, the Dark/Blue 2.5″ squares, and the Dark/Red 2.5″ square as shown in the picture below. The unit is a typical Nine Patch block.

Step 4:
Sew the squares into three rows as shown.

Step 5:
Press the seam allowances toward the dark fabrics as shown below.

Step 6:
Now sew the three rows together.

Step 7:
And press the seam allowances toward the outside of the unit as shown in the picture below.

Putting It All Together:
Step 8:
Lay out the Four-Patch units, the Center unit, and the four Light/White 4.5″ x 6.5″ rectangles as shown below. Once again the units go together like an uneven Nine Patch block.

Step 9:
Sew the units into three rows as shown.

Step 10:
Press the seam allowances toward the Light/White rectangles as shown in the picture below.

Step 11:
Sew the three rows together. You’re done except for…

Step 12:
the pressing. Press the seam allowances away from the center of the block. That was fast!

Layout Ideas:
Here’s the basic 4 x 4 layout using similar colors to the ones I used in the tutorial:

This version is the same as the one above except that I added in sashing and red cornerstones. There would be plenty of room to do some fancy quilting in the open areas.

Where this block really shines is when it’s used as an alternating block with more intricate blocks. Here I’m showing the block with only two colors.

In this example, I used three colors that coordinate with the more intricate block.

Since the applique block has so many colors in it, I felt the 7-Grid Chain had to be scrappy! Love this one!

This is an on-point example. Also scrappy because the Dresdan plate has so many colors in it as well.

Here’s a striking example using a black background and setting triangles in another on-point layout using just the 7-Grid Chain block. Very modern looking!

This on-point example is monochromatic – just dusty blue in light, medium, and dark tones. I also put in narrow sashing and cornerstones.
