If you love a quilt block that is easier to sew than it looks, the Mosaic Star is about to become a new favorite. This stunning 12″ traditional block achieves its striking effect using just three fundamental units (half square triangle, square in a square, and hourglass) making it perfect for quilters ready to level up without tackling advanced techniques.
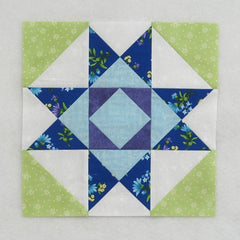
Fabric Requirements for a 12″ Finished Mosaic Star Quilt Block:
- Light/White: 1 – 5.5″ square, and 2 – 5″ squares
- Medium/Aqua: 1 – 5.5″ square, and 1 – 4.5″ square
- Medium/Green: 2 – 5″ square
- Dark/Purple: 4 – 2.5″ squares
- Dark/Blue: 2 – 5.5″ squares

Sewing Directions:
Half Square Triangle Units:
Step 1:
Using a Light/White 5″ square and a Medium/Green 5″ square, make Half Square Triangle (HST) units as shown. Here are the steps corresponding to the images in the picture below going from left to right.
- Match up the squares right sides together. Mark a diagonal line from corner to corner on the back of the Fabric A square and sew 1/4″ (or a little less) on each side of the line.
- Cut along the diagonal line. You will have 2 half-square triangle patches.

Step 2:
- Open up the patch and press the seam allowance away from the Light/White fabric.
- Square up/trim the units to 4.5″ square.
- You can find my tutorial for making HST units at https://quiltembroiderypdf.com/how-to-sew-a-basic-half-square-triangle-block

Step 3:

Square in a Square Unit:
Step 4:
- Mark a diagonal line from corner to corner on the back of the 2.5″ squares.
- Sew two Dark/Purple 2.5″ square to opposite corners of the Medium/Aqua 4.5″ square along the marked line. Note the orientation of the marked lines.
- Match the corners of the 2.5″ squares and press.

Step 5:
- Open up the 2.5″ squares and trim the seam allowances.
- Refold.

Step 6:
Repeat on the remaining two corners with two more Dark/Purple 2.5″ squares.

Hourglass Units:
Step 7:
- Using Steps 1 through 3 as a reference and using the two Dark/Blue 5.5″ squares, the Medium/Aqua 5.5″ square, and the Light/White 5.5″ square, sew together four Half Square Triangle units as shown in the picture below.
-
Press the seam allowances toward the Dark/Blue fabric. No need to trim/square up these units at this time as we will trim in a later step.

Step 8:
Using two of the Step 7 half-square triangle units (one of each coloring) make two three-color Hourglass units as shown below.
- Match the two half-square triangle patches, right sides together, and rotate one of the patches 180 degrees so the Dark/Blue sides are opposing each other and the seam allowances nest together nicely.
- Mark a diagonal line on back of the patches perpendicular to the seam line. This is more accurate than drawing a line from corner to corner.
- Sew ¼” (or a little less) on both sides of the diagonal line.
- Cut on the diagonal line.

Step 9:
- Open up the units and press seam allowance toward the Medium/Aqua & Dark/Blue side. At first I pressed using the tweak/twirl/furl method but that didn’t work for later on in the piecing.
- Trim/square up the units to 4.5″ square.
- You can find a detailed tutorial for making the three-color Hourglass block at https://quiltembroiderypdf.com/how-to-sew-a-basic-hourglass-or-quarter-square-triangle-block

Step 10:

Putting It All Together:
Step 11:

Step 12:

Step 13:

Step 14:

Step 15:

Layout Ideas:


