Learn how to make the stunning Lost and Found quilt block with this step-by-step tutorial! This striking 12″ block is perfect for confident beginners and experienced quilters alike, combining three classic units – half square triangles (HSTs), flying geese, and square-in-a-square – to create a bold, graphic diamond frame design.
Whether you’re building your piecing skills or adding a new favorite to your block library, the Lost and Found block delivers maximum visual impact with approachable construction. Grab your fabric and let’s get started!
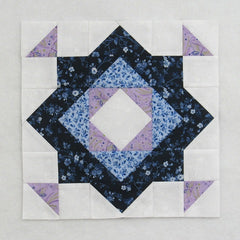
Fabric Requirements for a 12″ Finished Lost and Found Quilt Block:
- Light/White: 1 – 4.5″ square, 2 – 3″ squares, and 16 – 2.5″ squares
- Medium/Blue: 4 – 2.5″ x 4.5″ rectangles
- Medium/Purple: 2 – 3″ squares, and 4 – 2.5″ squares
- Dark/Blue: 4 – 2.5″ x 4.5″ rectangles, and 12 – 2.5″ squares

Sewing Directions:
Square in a Square Unit:
Step 1:

Half Square Triangle Units:
Step 2:

Corner Units:
Step 3:
- Lay out one of the Step 2 units, 2 Light/White 2.5″ squares, and a Dark/Blue 2.5″ square as shown below and sew the units into two rows (top left image).
- Press the seam allowances toward the Light/White squares (top right image).
- Sew the two rows together (bottom left image)
- Press the seam allowance. As you can see in the bottom right image, I pressed the seam allowance using the tweak/twirl/furl method. However, when I got to the final seams of the block I realized I should have pressed the seam allowance toward the top row (the row with the HST unit).


Step 4:
Repeat Step 3 for a total of four units.

Flying Geese Units:
Step 5:
Using eight Dark/Blue 2.5″ squares and four Medium/Blue 2.5″ x 4.5″ rectangles, sew together four Flying Geese units. For a detailed tutorial of my no-trim method for making perfect Flying Geese blocks check out https://quiltembroiderypdf.com/how-to-sew-a-basic-flying-geese-block. The picture below shows the first steps.
- Mark a diagonal line from corner to corner on the back of the Dark/Blue 2.5″ squares.
- Sew a Dark/Blue 2.5″ square to a Medium/Blue rectangle along the marked line (top image). Note the orientation of the marked line.
- Match the corners of the Dark/Blue square and press (second image).
- Open the square up and trim the seam allowance (third image).
- Refold (bottom image).

Step 6:

Step 7:

Step 8:

Middle Units:
Step 9:

Step 10:

Step 11:

Putting It All Together:
Step 12:

Step 13:

Step 14:

Step 15:

Step 16:

Layout Ideas:


