The Framed Nine Patch and Framed Square quilt blocks are a perfect pairing for a refreshing, easy, scrappy quilt design. Both blocks are beginner-friendly and come in two versatile sizes – 6½″ and 9″ finished – making them ideal for everything from baby quilts to larger quilts.
Made using only simple squares and rectangles, these blocks are straightforward to cut and piece, with detailed instructions for the partial seam technique that adds structure and visual interest. When sewn together, the alternating framed centers create a beautifully balanced quilt that looks like one your grandmother might have made.
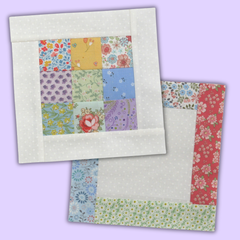
Fabric Requirements for the Framed Nine Patch and Square Quilt Blocks:
Sewing Directions are for making the 6.5″ finished block.
6.5″ Finished Size:
- Light/White: 1 – 5″ square, and 4 – 1.5″ x 6″ rectangles
- Assorted Prints: 4 – 1.5″ x 6″ rectangles, and 9 – 2″ squares
- Approximate Yardage for a 5 x 5 layout (32.5″ square quilt) is 3/4 yard each of Light/White and Assorted Prints.
9″ Finished Size:
- Light/White: 1 – 6.5″ square, and 4 – 2″ x 8″ rectangles
- Assorted Prints: 4 – 2″ x 8″ rectangles, and 9 – 2.5″ squares
-
Approximate Yardage for a 5 x 5 layout (45″ square quilt) is 1+1/8 yards each of Light/White and Assorted Prints.

Sewing Directions:
Framed Square Block:
Step 1:
I find it helpful to begin by laying out the four Assorted Prints 1.5″ x 6″ rectangles and the Light/White 5″ square as shown in the picture below.

Step 2:
Sew the top Assorted Prints rectangle to the 5″ square using partial seam construction. As you can see in the photo below, I’ve started sewing in the middle of the 5″ square out to the right side. Press the partial seam away from the Light/White square.

In this picture I’ve darkened up my stitching so you can see where I started and stopped sewing.

Step 3:
Now you can sew the right Rectangle unit to the right side of the Step 2 unit and press the seam allowance away from the Light/White square as shown in the pictures below.


Step 4:
Now you can sew the bottom Rectangle unit to the bottom of the Step 3 unit and press the seam allowance away from the Light/White square as shown in the pictures below.


Step 5:
Now you can sew the left Rectangle unit to the left side of the Step 4 unit and press the seam allowance away from the Light/White square as shown in the pictures below.


Step 6:
Finish sewing up that partial seam you started with and press the seam allowance away from the Light/White square as shown in the pictures below.


Framed Nine Patch Block:
Step 7:
Using the nine 2″ squares, lay out the squares in a nine patch configuration as shown below. The unit goes together like a basic Nine Patch block.

Step 8:
Sew the units into three rows as shown below.

Step 9:
Press the seam allowances in opposite directions from row to row as shown in the picture below.

Step 10:
Sew the three rows together to complete the unit.

Step 11:
Press the seam allowances. As you can see in the photo below, I’ve pressed mine toward the outside but you can press however you wish.

Step 12:
Lay out the four Light/White 1.5″ x 6″ rectangles as shown in the picture below.

Step 13:
Repeat Steps 2 through 6 substituting the Light/White rectangles for the Assorted Prints rectangles so you get a block like the one shown in the picture below.

Here’s a picture of the back of the block.

And here are the two blocks side by side.

Layout Ideas:
Here’s an example of a 5 x 5 layout with the two blocks.

This is the same layout but using a light blue for the Light/White fabric.

For a dramatic look, try substituting black for the Light/White fabric.

In this layout I substituted a simple chain block for the Framed Square block.
