The Thirteen Squares pattern is easy to sew together and creates a wonderful design across a quilt top! The block can be made with yardage or scraps (or both)!
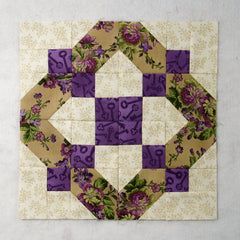
When made the traditional way, there are 13 squares in the block – 12 little ones and another is formed where four of the small squares meet in the center. Let’s get started!
Fabric Requirements for a 12″ Finished Thirteen Squares Quilt Block:
- Light/Ivory: 4 – 2″ x 3.5″ rectangles, and 28 – 2″ squares
- Medium/Tan: 8 – 3.5″ squares
- Dark/Purple: 12 – 2″ squares

Sewing Directions:
Four Patch Units:
Step 1:
Using eight of the Light/Ivory 2″ squares and eight of the Dark/Purple 2″ squares, sew together four Four Patch units as shown in the picture below. If you are making several blocks, I would recommend using the strip piecing method for constructing these units. You can find both methods in the tutorial on the basic Four Patch block at https://quiltembroiderypdf.com/how-to-sew-a-basic-four-patch-quilt-block

Partial Square in a Square Units:
Step 2:
Using the picture below and the instructions for the first two corners of a basic Square in a Square block, sew together eight Partial Square in a Square units. You can find my tutorial for the basic Square in a Square block at https://quiltembroiderypdf.com/how-to-sew-a-basic-square-in-a-square-block

Three Patch Units:
Step 3:
Sew together a Light/Ivory 2″ square and a Dark/Purple 2″ square as shown below. Press the seam allowance toward the Dark/Purple square.

Step 4:
Sew a Light/Ivory 2″ x 3.5″ rectangle to the Step 3 unit and press the seam allowance toward the rectangle as shown in the picture below. Repeat Steps 3 and 4 for a total of four Three Patch units.

Putting It All Together:
Step 5:
Lay out two Partial Square in a Square units, a Four Patch unit, and a Three Patch unit as shown in the picture below.

Step 6:
Now you can sew the four units together just like a regular Four Patch block. First sew the units into two rows and press the seam allowances away from the Partial Square in a Square units.

Step 7:
Then sew the two rows together and press the seam allowance. You can see the tweak/twirl/furl method of pressing the seam allowance in the picture below. Repeat Steps 5 through 7 for a total of four units.

Step 8:
Lay out the four units as shown below. Again, we’ll be sewing these together just like a basic Four Patch block.

Step 9:
Now you can sew the units into two rows as shown in the picture below.

Step 10:
And press the seam allowances in opposite directions so that the seams will nest together nicely.

Step 11:
Sew the two rows together, and…

Step 12:
Press the seam allowances. You’re done!
