Let’s learn how to sew a Steps to the Altar quilt block today!
This is the last block for a quilt I’ve been working on for a couple of years – Yeah!! I got the pattern from Kim Diehl’s Evening Star Quilt pattern. It is a Steps to the Altar quilt block with a color placement variation. It is a great block to use up your medium and dark scraps and creates a nice secondary pattern when put together in a quilt. Of course you could use light and medium fabric colors and get a whole different feel to the finished quilt. You can see more of Kim Diehl’s patterns and fabric on her Facebook page https://www.facebook.com/kim.diehl.96
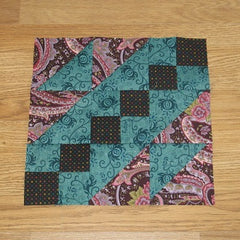
Fabric Requirements for a 12″ Steps to the Altar Quilt Block:
- Black Print – 6 – 2.5″ squares
- Medium/Dark 1 – 6 – 2.5″ squares, and 3 – 5″ squares
- Medium/Dark 2 – 3 – 5″ squares
Sewing Directions:
We’ve already gone over the two patches that make up this block – the Four Patch and the Half-Square Triangle.
Step 1:
Four Patch Units:
Using the 2.5″ Black Print squares and the 2.5″ Medium/Dark 1 squares, make 3 Four Patch units. You can read the tutorial for the Four Patch block here: https://fabric-406.myshopify.com/blogs/fabric406-blog/how-to-sew-a-basic-four-patch-quilt-block
Step 2:
Half-Square Triangle Units:
Using the 5″ Medium/Dark 1 squares and the 5″ Medium/Dark 2 squares, make 6 Half-Square Triangle units. You can find my Half-Square Triangle tutorial here: https://fabric-406.myshopify.com/blogs/fabric406-blog/how-to-sew-a-basic-half-square-triangle-block

Step 3:
The sewing construction goes together just like a Basic Nine-Patch block (https://fabric-406.myshopify.com/blogs/fabric406-blog/how-to-sew-a-basic-nine-patch-quilt-block).
Layout the Four-Patch and Half-Square Triangle units as shown above and sew into 3 rows. Press the seam allowances in the top and bottom rows toward the outside of the block and the middle row toward the inside of the block.

Here you can see the direction for pressing the seam allowances.

Step 4:
Then you sew the 3 rows together and you’re done!

Step 5:
Press the seam allowances toward the center of the block. Here is a picture of the back of the finished block showing the direction of the seam allowances.
