The Mill Wheel quilt block is one of those timeless traditional quilt blocks and is quick and easy to sew together. There are lots of quilt blocks with names that relate to mills or water wheels – probably a nod to how important these machines were back in the time when the blocks were designed. Let’s get started!
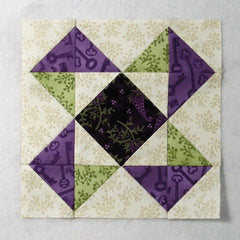
Fabric Requirements for an 8″ Finished Mill Wheel Quilt Block:
- Light/Ivory: 4 – 2.5″ x 4.5″ rectangles, 2 – 3″ squares, and 4 – 2.5″ squares
- Medium/Green: 4 – 2.5″ squares
- Medium/Purple: 2 – 3″ squares, and 4 – 2.5″ squares
- Dark/Purple: 1 – 4.5″ square

Sewing Directions:
Half Square Triangle Units:
Step 1:
Using the Light/Ivory 3″ squares and the Medium/Purple 3″ squares, sew together four Half Square Triangle units like the ones shown below.

Step 2:
When you press the Half Square Triangle units, press toward the Light/Ivory fabric. I know this is contrary to the “press toward the dark fabric” directive that goes with pressing rules. But pressing toward the lighter fabric for this block makes matching seams easier later on in construction.

Three-Color Flying Geese Units:
Step 3:
Using the Light/Ivory 2.5″ x 4.5″ rectangles and the four Medium/Purple 2.5″ squares, make the first half of the Three-Color Flying Geese units. You can find my detailed instructions for making Flying Geese blocks at https://quiltembroiderypdf.com/how-to-sew-a-basic-flying-geese-block. Here’s a quick rundown of the steps:
- Top image: Draw a diagonal line on the back of the Medium/Purple square and sew to one end of the Light/Ivory rectangle as shown.
- 2nd image: Match the corners of the square and press.
- 3rd image: Trim away the excess seam allowance
- Bottom image: Refold

Step 4:
Now you can repeat Step 3 using the Medium/Green 2.5″ squares instead of the Medium/Purple squares.

Step 5:
Repeat Steps 3 and 4 for a total of four Three-Color Flying Geese units.

Square in a Square Unit:
Step 6:
Using the Dark/Purple 4.5″ square and the four Light/Ivory 2.5″ squares, piece together a Square in a Square unit. You can find detailed instructions for making a basic Square in a Square block at https://quiltembroiderypdf.com/how-to-sew-a-basic-square-in-a-square-block.

Putting It All Together:
Step 7:
Lay out the Half Square Triangle units, the Three-Color Flying Geese units, and the Square in a Square unit as shown in the picture below.

Step 8:
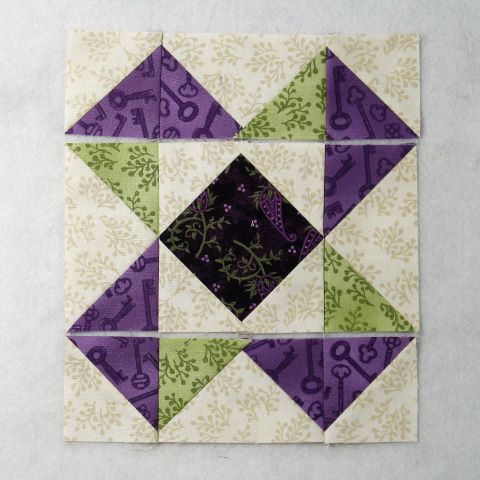
From here the Mill Wheel goes together like an uneven Nine Patch block. First, sew the units into three rows as shown below. (This and Step 10 is where pressing the Half Square Triangles toward the light side makes matching seams easier.)
Step 9:
Press the seam allowances away from the Three-Color Flying Geese units as shown.

Step 10:
Sew the three rows together to complete the block.

Step 11:
All that’s left is to press the seam allowances toward the center of the block as shown in the picture below.

Layout Ideas:
Here’s the basic 4 x 4 layout with colors similar to the tutorial.


