Today we’re going to look at the Chained Nine Patch quilt block. This 12″ block is fairly easy to sew together. I did make a modification and used a modified Flying Geese unit instead of the regular Flying Geese to eliminate a couple of seams. At the end of the tutorial I’ll show you a couple of different color placements that (I think) greatly improve the block. Let’s get started!
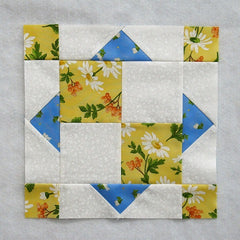
Fabric Requirements for a 12″ Finished Chained Nine Patch Quilt Block:
- Light/White: 2 – 4.5″ squares, and 8 – 2.5″ x 4.5″ rectangles
- Medium/Yellow: 2 – 4.5″ squares, and 4 – 2.5″ squares
- Dark/Blue: 4 – 2.5″ x 4.5″ rectangles

Sewing Directions:
Four Patch Unit:
Step 1:
Using the two Light/White 4.5″ squares and the two Medium/Yellow 4.5″ squares, sew together a basic Four Patch unit as shown in the picture below. A tutorial for making a Four Patch block can be found at https://quiltembroiderypdf.com/how-to-sew-a-basic-four-patch-quilt-block

Modified Flying Geese Unit:
Step 2:
On the back of the eight Light/White 2.5″ x 4.5″ rectangles, mark a 45 degree diagonal line as shown in the picture below. Note that half of the lines go in one direction and half in the other.

Step 3:
Now you can sew one of the Step 2 rectangles to a Dark/Blue 2.5″ x 4.5″ rectangle as shown in the picture below. You can see that I’ve sewn close to the marked line in the seam allowance area. This will allow for the thickness of the fabric when it gets folded over.

Step 4:
Now press the Light/White patch as shown below.

Step 5:
Now open the Light/White rectangle back up and trim the seam allowance to approximately 1/4″.

Step 6:
Now you can fold the Light/White patch again – half done with this unit!

Step 7:
Repeat Steps 3 through 6 except on the other end of the Dark/Blue rectangle as shown in the pictures below. Repeat Steps 3 through 7 for a total of four units.


Putting It All Together:
Step 8:
Now you can sew one of the Modified Flying Geese units to opposite sides of the center Four Patch unit as shown in the picture below.

Step 9:
Press the seam allowances toward the center Four Patch unit as shown below.

Step 10:
Now you sew a Medium/Yellow 2.5″ square to each end of the remaining Modified Flying Geese units and press the seam allowance toward the Medium/Yellow square as shown in the picture below.

Step 11:
Lay out the Steps 9 and 10 units in three rows as shown below.

Step 12:
And sew the three rows together.

Step 13:
All done except for the pressing! Press the seam allowances away from the center of the block as shown in the picture below.
