Let’s sew together an Orion’s Wheel block today! The block is fairly easy and uses only half square triangles, flying geese and squares in its construction. Let’s get started!
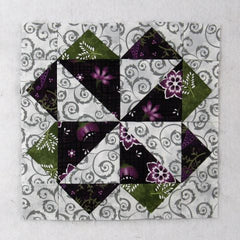
Fabric Requirements for a 9″ Finished Orion’s Wheel Quilt Block:
- Light/Gray: 2 – 4″ squares, and 20 – 2″ squares
- Medium/Green: 4 – 2″ x 3.5″ rectangles
- Dark/Purple 1: 2 – 4″ squares
- Dark/Purple 2: 4 – 2″ x 3.5″ rectangles

Sewing Directions:
Half Square Triangle Units:
Step 1:
Using the Light/Gray 4″ squares and the Dark/Purple 1 4″ squares, sew together four Half Square Triangle units like the ones in the picture below. You can find my detailed tutorial on how to make half square triangles at https://quiltembroiderypdf.com/how-to-sew-a-basic-half-square-triangle-block. Trim/square up the units to 3.5″ square.

Flying Geese Units:
Step 2:
Using the Medium/Green 2″ x 3.5″ rectangles and eight of the Light/Gray 2″ squares, piece together four Flying Geese units as shown in the picture below. You will find the tutorial showing my no-trim method for making flying geese blocks at https://quiltembroiderypdf.com/how-to-sew-a-basic-flying-geese-block

Step 3:
Repeat Step 2 only substituting the Dark/Purple 2 rectangles for the Medium/Green rectangles.

Corner Units:
Step 4:
Lay out one Half Square Triangle unit, one Medium/Green Flying Geese unit, one Dark/Purple 2 Flying Geese unit, and one Light/Gray 2″ square as shown in the picture below.

Step 5:
Sew the units into two rows and press the seam allowance away from the Flying Geese units as shown in the picture below.

Step 6:
Now you can sew the two rows together to complete the Corner unit. Press the seam allowance away from the Half Square Triangle unit as shown in the picture below. Repeat Steps 4 through 6 for a total of four Corner units.

Putting It All Together:
Step 7:
Lay out the four Corner units as shown in the picture below.

Step 8:
Sew the units into two rows as shown below. This is just like sewing together a basic Four Patch block.

Step 9:
Press the seam allowances in opposite directions as shown in the picture below.

Step 10:
Now you can sew the rows together and…

Step 11:
Press the seam allowance. You can see in the picture below that I used the tweak/twirl/furl method for pressing so that the block will lay flatter. All done!

Layout Options:
Here’s the basic 4 x 4 layout of the block:

And here it is with a simple sashing and cornerstone layout:

Then I had to try it with colored sashing – much better.

And how about a pieced border?

Then there’s an on-point layout:

And another on-point with alternating large hourglass blocks:

Another on-point layout:

And here’s the same layout but with colored setting triangles:
