Today let’s sew together a Right Hand of Fellowship quilt block. This version is an easier way for you to construct the block than the traditional method. It is quick, easy, and very striking! The coloring is the same as the classic block – just the piecing is different.
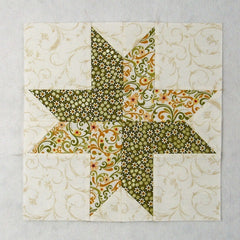
Fabric Requirements for a 12″ Finished Right Hand of Fellowship Quilt Block:
- Light/Ivory: 4 – 4.5″ squares, and 8 – 2.5″ squares
- Medium/Swirl: 4 – 2.5″ x 4.5″ rectangles, and 2 – 2.5″ squares
- Dark/Green: 4 – 2.5″ x 4.5″ rectangles, and 2 – 2.5″ squares

Sewing Directions:
Center Unit:
Step 1:
Using the picture below as a reference and the Medium and Dark 2.5″ squares, piece together a Four Patch unit. You can find the tutorial for making a basic Four Patch at https://quiltembroiderypdf.com/how-to-sew-a-basic-four-patch-quilt-block

Star Point Units:
Step 2:
Draw a diagonal line from corner to corner on the back of the Light/Ivory 2.5″ squares. Match up four of the Light/Ivory 2.5 squares with the Medium/Swirl 2.5″ x 4.5″ rectangles and sew along the marked line. NOTE: You will be making four patches but two will be mirror images of the other two. Then fold the Light/Ivory 2.5″ square along the sewn line, match up the corners, and press as shown in the picture below.

Step 3:
Now unfold the Light/Ivory 2.5″ squares and trim away the seam allowance. Refold to complete the patch. You will have two patches with the point going in one direction and two patches with the point going in the opposite direction as you can see in the picture below.

Step 4:
Repeat Steps 2 and 3 using the remaining Light/Ivory 2.5″ squares and the four Dark/Green 2.5″ x 4.5″ rectangles as shown below.

Step 5:
Match up the Step 3 units and the Step 4 units as shown in the pictures below.


Step 6:
Sew the Steps 3 and 4 units together and press the seam allowances open as shown below. Note that two of these units will have the Dark/Green on the left and two will be on the right.

Putting It All Together:
Step 7:
Using the picture below as a reference, lay out the four Light/Ivory 4.5″ squares, the Center unit, and the Star Point units.

Step 8:
From here the block goes together like a basic Nine Patch block. First, sew the units together into three rows as shown in the picture below.

Step 9:
Press the seam allowances away from the Star Point units as shown below.

Step 10:
Then sew the three rows together, and…

Step 11:
Press the seam allowances away from the center of the block as shown in the picture below. You’re done!

Layout Ideas:


