The Streak of Lightning quilt block is a great block for using up those skinnier strips you’ve been saving and finishes at 10″ square! It is similar to a Log Cabin block (you can find my tutorial for a Log Cabin block at https://fabric-406.myshopify.com/blogs/fabric406-blog/free-pattern-log-cabin-quilt-block
Let’s do this!
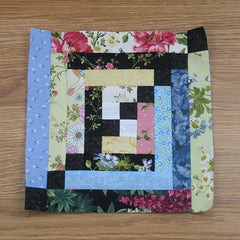
Update: I now have a PDF pattern of this block in three sizes available in my Etsy shop if you prefer to have a printed pattern. Check it out by clicking this link: STREAK OF LIGHTNING
Fabric Requirements for a 10″ Finished Streak of Lightning Quilt Block:
- Light/White: 2 – 1.5″ squares
- Dark/Black: 10 – 1.5″ squares
- Assorted Prints:
- 2 – 2.5″ x 1.5″ rectangles
- 2 – 3.5″ x 1.5″ rectangles
- 2 – 4.5″ x 1.5″ rectangles
- 2 – 5.5″ x 1.5″ rectangles
- 2 – 6.5″ x 1.5″ rectangles
- 2 – 7.5″ x 1.5″ rectangles
- 2 – 8.5″ x 1.5″ rectangles
- 2 – 9.5″ x 1.5″ rectangles

Sewing Directions:
Step 1:
Four Patch Unit:
First off, using the 2 Light/White 1.5″ squares and 2 of the Dark/Black 1.5″ squares, make a simple Four Patch unit as shown in the picture below. You can find the tutorial on making Four Patch units at https://fabric-406.myshopify.com/blogs/fabric406-blog/how-to-sew-a-basic-four-patch-quilt-block

Step 2:
Strips Sets:
With the remaining 8 Dark/Black 1.5″ squares and the 3.5″, 5.5″, 7.5″, and 9.5″ rectangles, sew strip sets as shown below. Press the seam allowances away from the Dark/Black square. I started out pressing toward the black square, but in the end it was better to press away from the black square – so I won’t be showing pictures of the back of the block until later on – Lol!

Step 3:
Block Construction:
Sew a 1.5″ x 2.5″ rectangle to opposite sides of the Four Patch unit. Press seam allowances toward the rectangles.

Step 4:
Using the two 4.5″ strip sets you made above, sew them to the sides of the unit you just made. The seams should nest nicely and you can press the seam allowances toward the outside of the unit.

Step 5:
Now sew the two 4.5″ x 1.5″ rectangles to the top and bottom of the unit and press the seam allowances toward the outside of the unit.

Step 6:
Here’s where I started pressing the seam allowances correctly.


