So this traditional Judy’s Star quilt block is simple but has a nice design with the light star points peeking out from behind the darker one. Judy’s Star was designed by Judy Martin (that makes sense). This block goes together quick so let’s get started!
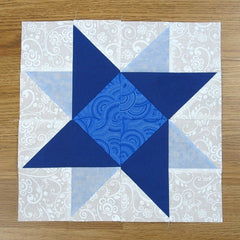
Fabric Requirements for a 12″ Judy’s Star Quilt Block:
- Light 1/White: 2 – 4″ squares, and 8 – 3.5″ squares (I guess I don’t know how to count and only show 4 squares in the picture!)
- Light 2/Light Blue: 2 – 4″ squares
- Medium/Blue Print: 4 – 3.5″ squares
- Dark/Dark Blue: 4 – 3.5″ x 6.5″ squares

Sewing Directions:
Half-Square Triangle Units:
Step 1:
Using the two Light 1/White 4″ squares and the two Light 2/Light Blue 4″ squares, sew together four Half-Square Triangle units as shown in the picture below. You can find my tutorial for making Half-Square Triangles (also known as HST) at: https://quiltembroiderypdf.com/how-to-sew-a-basic-half-square-triangle-block

Flying Geese Units:
Step 2:
Using the four Dark/Dark Blue 3.5″ x 6.5″ rectangles, the Light 1/White 3.5″ squares, and the Medium/Blue Print 3.5″ squares, make four Flying Geese units like shown in the picture below. Make sure that the White is on the left side and the Blue Print is on the right! You can find my tutorial for making Flying Geese units at: https://quiltembroiderypdf.com/how-to-sew-a-basic-flying-geese-block

Step 3:
Sew together a Half-Square Triangle unit and a Light 1/White 3.5″ square as shown below. Be sure to get the orientation right! Press the seam allowance away from the Half-Square Triangle unit. Repeat for a total of four units.

Putting It All Together:
Step 4:
Now you can sew together one of the Flying Geese units with one of the Step 3 units as shown in the picture below.

Step 5:
And press the seam allowance toward the Flying Geese unit as you can see in the picture below. Repeat Steps 4 and 5 for a total of four units.

Step 6:
The rest of the Judy’s Star block goes together just like a basic Four Patch block. Lay out the four Step 5 units as shown below.

Step 7:
Sew the units together into two rows…

Step 8:
Press the seam allowances in opposite directions as shown in the picture below.

Step 9:
Now you can sew the two rows together – all done except for the pressing.

Step 10:
Press the seam allowance. As you can see in the picture below, I have pressed the seam allowance using the tweak/twirl/furl method. We’re done!

Layout Ideas:


