Today let’s sew together this traditional quilt block called Hot Cross. I assume it’s named after hot cross buns but that’s only a guess! It is easier than it looks so let’s get started!
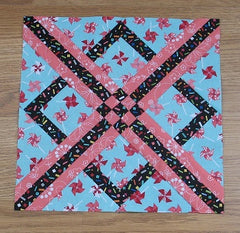
Fabric Requirements for a 12″ Finished Hot Cross Quilt Block:
- Medium 1/Pink: 4 – 1.25″ squares, and 8 – 1.25″ x 9″ rectangles
- Medium 2/Blue: 4 – 3” squares, and 2 – 6″ squares cut in half diagonally for a total of 8 triangles
- Dark/Black: 5 – 1.25″ squares, 4 – 1.25″ x 3″ rectangles, 4 – 1.25″ x 3.75″ rectangles, and 4 – 1.25″ x 9″ rectangles

Sewing Directions:
Step 1:
Strip Sets:
Using the picture below as a reference, sew together a Medium 1/Pink 1.25” x 9” rectangle, a Dark/Black 1.25” x 9” rectangle, and another Medium 1/Pink 1.25” x 9” rectangle along the long sides.

Step 2:
Press seam allowances toward the Dark/Black strip as shown below. The strip set should measure 2.75” in width. Repeat for a total of 4 strip sets. Square up one short end – the other end will be trimmed off later.

Step 3:
Nine-Patch Center:
Using the picture below as a reference, arrange 5 Dark/Black 1.25” squares and 4 Medium 1/Pink 1.25” squares in a nine-patch pattern. Sew the squares into rows. Press seam allowances toward the Dark/Black fabric. Sew the rows together.

Step 4:
Press seam allowances toward the outside of the patch as shown in the picture below. You can find my tutorial on making the Nine-Patch block at https://quiltembroiderypdf.com/how-to-sew-a-basic-nine-patch-quilt-block

Step 5:
Triangle Unit:
Using the picture below as a reference, sew a Dark/Black 1.25” x 3” rectangle to one side of a Medium 2/Blue 3” square.

Step 6:
Press seam allowance toward the Dark/Black rectangle as shown below.

Step 7:
Using the picture below as a reference, sew a Dark/Black 1.25” x 3.75” rectangle to an adjacent side of the Step 5 unit.

Step 8:
Press seam allowance toward the Dark/Black rectangle as shown below.

Step 9:
Using the picture below as a reference, sew a Medium 2/Blue triangle to the Step 7 unit.

Step 10:
Press seam allowance toward the Medium 2/Blue triangle as shown in the picture below.

Step 11:
Using the picture below as a reference, sew a Medium 2/Blue triangle to the Step 9 unit. Repeat Steps 5 through 11 to make a total of 4 Triangle Units.

Step 12:
Press seam allowance toward the Medium 2/Blue triangle as shown in the picture below.

Step 13:
Using the picture below as a reference, sew one Step 12 unit to each side of a Step 1 unit, aligning the edges as shown and taking care that the Dark/Black strips line up in the same spot on each side of the Step 1 unit.

Step 14:
Press seam allowance toward the center as shown in the picture below. Repeat for a total of 2 units.

Step 15:
Using Diagram 8 as a reference, sew one Step 1 unit to opposite sides of a Step 3 unit.

Step 16:
Press seam allowance away from the Step 3 unit as shown below.

Putting It All Together:
Step 17:
Sew one Step 13 unit to each side of a Step 15 unit as shown in the picture below.

Step 18:
Press seam allowances toward the center as shown below.

Step 19:
Square up the Hot Cross quilt block, trimming off excess but making sure to leave a .25” seam allowance so you don’t lose your points. In a perfect world, the block will measure 12.5” square.

In Conclusion:
While this Hot Cross block is not a beginner block, it is not too difficult either. Just take your time and it will turn out great! This should be stunning in a quilt – diagonal strips and diamond shapes. I’ll have to make up some layouts of this block on the computer and share them with you.
I hope you’ve enjoyed this tutorial. If you have and want to see more, simply click HERE to sign up for my newsletter (and receive a free PDF quilt pattern called “Chained Weathervane”).
Happy Quilting!
Elaine
P.S. I have a placemat pattern that uses this block which you can find at https://www.etsy.com/listing/1474140456/quilted-placemat-pdf-pattern-x-marks-the