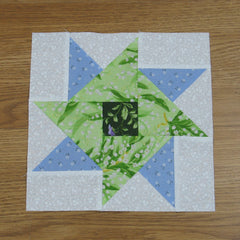
Today we’re going to sew together a Hope of Hartford quilt block – another partial seam construction! It finishes at 10″ square and isn’t difficult to put together. Let’s get started!
Fabric Requirements for a 10″ Finished Hope of Hartford Quilt Block:
- Light/White: 1 – 5.5″ square, cut in half diagonally twice; 4 – 2.5″ x 4.5″ rectangles
- Medium/Blue: 1 – 5.5″ square, cut in half diagonally twice
- Medium/Green: 2 – 5″ squares, cut in half diagonally once
- Dark/Green: 1 – 2.5″ square (oops, I forgot to include him in the picture!)

Sewing Directions:
Step 1:
First of all I recommend hitting all the triangle pieces with some spray starch. We’re going to be sewing on bias edges and the starch helps keep the edges from stretching.
Step 2:
Triangle Unit:
Sew together one of the Light/White triangles and one of the Medium/Blue triangles along one of the shorter sides as shown in the picture. Press seam allowance toward the Medium/Blue. Repeat to make a total of 4 Triangle units. Be sure that they are all orientated the same way!

Step 3:
Three Triangle Unit:
Now match up one the Triangle units you just made with one of the Medium/Green triangles and sew together along the long side. We’re going to call this a Three Triangle Unit. Press seam allowance toward the Medium/Green fabric. Square up/trim the unit to a 4.5″ square. I showed how to square up a block in the Hourglass block tutorial which you can read here: https://fabric-406.myshopify.com/blogs/fabric406-blog/how-to-sew-a-basic-hourglass-or-quarter-square-triangle-block. Repeat for a total of four units.

Step 4:
Rectangle Unit:
Match up one of the Light/White 2.5″ x 4.5″ rectangles with one of the Three Triangle Units you just completed. Sew a long side of the rectangle to the Medium/Blue side of the unit as shown in the picture. Press seam allowance toward the Light/White.

Putting It All Together:
Step 5:
Lay out all the Rectangle Units and the Dark/Green 2.5″ square as shown in the picture below.

Step 6:
Starting with the upper left unit, sew the Dark/Green 2.5 square to the Rectangle Unit with a partial seam. I’ve marked my seam line with black marker so you can see where I’ve sewn the two together.

Step 7:
Press the seam allowance away from the Dark/Green 2.5″ square.

Step 8:
Now you can sew the upper right unit and …

Step 9:
Press the seam allowance away from the Dark/Green 2.5″ square as shown below.

Step 10:
Continue around going in a clockwise manner, pressing seam allowances away from the center.


Step 11:
Press the last seam allowance away from the center and you’re done!

In Conclusion:
The Hope of Hartford block is a pinwheel variation. Even with the partial seam construction, it isn’t hard to sew and goes together quickly.
I hope you enjoyed this block! If you like this tutorial and want to see more as they come out, just click HERE to receive a free PDF quilt pattern called “Chained Weathervane”.
Happy Quilting!
Elaine