Today let’s sew together this easy traditional quilt block called Uncle Sam’s Hourglass. It goes together fast and can showcase that larger scale print you don’t want to cut into little pieces. Let’s get started!

Traditionally, this block was made with just a light and a dark fabric. But that center square just begs for a focal print! You could also use it to showcase embroidery or applique.
Fabric Requirements for a 12″ Finished Uncle Sam’s Hourglass Quilt Block:
- Light/White: 4 – 4.5″ squares, and 4 – 3.5″ squares
- Focal: 1 – 6.5″ square
- Accent: 4 – 4.5″ squares

Sewing Directions:
Hourglass Units:
Step 1:
Using the Light/White 4.5″ squares and the Accent 4.5″ squares, sew together eight Hourglass units. You will find my tutorial for making Hourglass blocks at https://quiltembroiderypdf.com/how-to-sew-a-basic-hourglass-or-quarter-square-triangle-block I pressed my seam allowances using the tweak/twirl/furl method. Trim/square up the units to 3.5″ square.

Step 2:
Sew together two of the Step 1 units as shown in the picture below. If you match up two Step 1 units where the seam allowances twirl in the same direction, then your seams will nest together nicely. I decided to press this seam allowance open so it lays flatter which you can also see in the picture.

Putting It All Together:
Step 3:
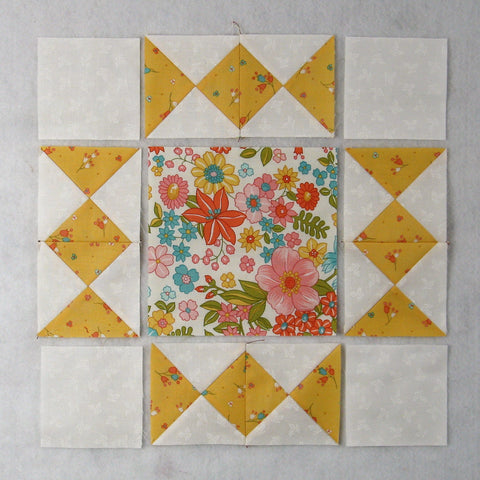
Arrange the Step 2 units, the four Light/White 3.5″ squares, and the Focal 6.5″ square as shown in the picture below.
Step 4:
From here the Uncle Sam’s Hourglass block goes together just like an uneven Nine Patch block. Sew the units into three rows as shown below.

Step 5:
Press the seam allowances away from the Hourglass units as shown in the picture below.

Step 6:
Now you can sew the three rows together and…

Step 7:
Press the seam allowances toward the center of the block as shown in the picture below. You’re done!
