This variation of the traditional Churn Dash block keeps the simplicity and charm of the original while adding a bit more interest. It could also be a variation of the Shoo Fly and/or Monkey Wrench block, but I think Churn Dash is a better fit. (I have some layout examples at the end.) Let’s check it out!
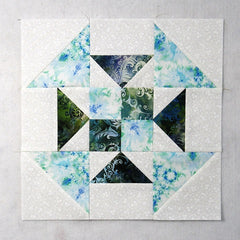
Fabric Requirements for a 12″ Finished Churn Dash Variation Quilt Block:
- Light/White: 2 – 5″ squares, 4 – 2.5″ x 4.5″ rectangles, and 8 – 2.5″ squares
- Medium/Blue: 2 – 5″ squares, and 2 – 2.5″ squares
- Dark/Green: 4 – 2.5″ x 4.5″ rectangles, and 2 – 2.5″ squares

This block also translates well to a 9″, 15″ or 18″ finished block. Because it is based on a Nine Patch block, it works best to have a size that is divisible by 3.
Sewing Instructions:
Four Patch Unit:
Step 1:
The center unit of the block is a simple Four Patch block made with the Medium/Blue 2.5″ squares and Dark/Green 2.5″ squares as shown in the picture below. You can find the tutorial for making a Four Patch block at https://quiltembroiderypdf.com/how-to-sew-a-basic-four-patch-quilt-block. If you are making a quilt with this Churn Dash Variation block, you could certainly use the strip piecing method for making the Four Patch units.

Half Square Triangle (HST) Units:
Step 2:
Using the two Light/White 5″ squares and the two Medium/Blue 5″ squares, sew together four Half Square Triangle Units as shown below. Trim/square up the units to 4.5″ square. You will find my tutorial for sewing HSTs at https://quiltembroiderypdf.com/how-to-sew-a-basic-half-square-triangle-block. Normally, I would press the seam allowances toward the darker fabric but I must have been having a “senior moment” and pressed toward the white fabric. It really doesn’t matter which direction on this simple block.

Flying Geese Units:
Step 3:
This is the most difficult to sew piece of the block – and it’s not that difficult if you follow my easy “no need to trim” method of construction. You can find that at https://quiltembroiderypdf.com/how-to-sew-a-basic-flying-geese-block. Carol, my friend/quilting mentor (and local quilting instructor), taught me this method many years ago.
Anyway, make four Flying Geese units using the four Dark/Green 2.5″ x 4.5″ rectangles and eight Light/White 2.5″ squares like the ones in the picture below.

Step 4:
Match up a Step 3 Flying Geese unit with a Light/White 2.5″ x 4.5″ rectangle and sew together as shown in the picture below. Press the seam allowance toward the Light/White fabric. Repeat for a total of four units.

Putting It All Together:
Step 5:
Lay out the Four Patch unit, the Half Square Triangle units, and the Flying Geese units as shown in the picture below. From here the block goes together just like a typical Nine Patch block.

Step 6:
Sew the units into three rows as shown below.

Step 7:
And press the seam allowances away from the Flying Geese units as shown in the picture below.

Step 8:
Sew the rows together and you’re done!

Step 9:
Well, except for the pressing! Press the seam allowances toward the center of the block as shown below.

Layout Ideas:
Here’s the basic 4 x 4 layout with colors similar to the tutorial.

In this example I’ve added in narrow (1″) sashing and cornerstones.


