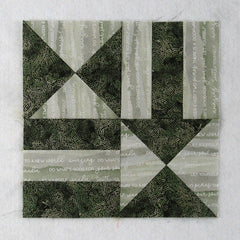
Today let’s look at the Chain and Hourglass quilt block. This quick and easy block is great for beginners. You only need two fabrics (a light and a dark) but I think it would be nice as a scrappy block as well. Not sure where the “chain” part of the name comes in but oh well. Let’s get sewing!
Fabric Requirements for a 9″ Finished Chain and Hourglass Quilt Block:
- Light Green: 1 – 6″ square, and 3 – 2″ x 5″ rectangles
- Dark/Green: 1 – 6″ square, and 3 – 2″ x 5″ rectangles (Oops, I made a mistake in the picture – too used to needing 4 Hourglass patches in a block – you only need one 6″ square of each color.)

If you want to make a 12″ block instead, increase the squares to 7.5″ and the rectangles to 2.5″ x 6.5″.
Sewing Directions:
Hourglass Unit:
Step 1:
Using the Light Green 6″ square and the Dark Green 6″ square, sew together two Hourglass units like the one shown in the picture below. Trim/square up the patch to 5″ square. This is the hardest part of this block and my tutorial at https://quiltembroiderypdf.com/how-to-sew-a-basic-hourglass-or-quarter-square-triangle-block makes it easy.

Roman Stripe Unit:
Step 2:
Next you will sew together two Roman Stripe patches using the Light Green and Dark Green 2″ x 5″ rectangles – one will be Light/Dark/Light and one will be Dark/Light/Dark – as shown in the picture below. I have a tutorial for the Roman Stripe block at https://quiltembroiderypdf.com/free-pattern-for-a-basic-roman-stripe-block.

Step 3:
Press the seam allowances whichever direction you prefer. In the picture below you can see that I pressed mine toward the outside of the block but it really doesn’t matter.

Putting It All Together:
Step 4:
Lay out the two Hourglass units and the two Roman Stripe units as shown below. Notice that the units go in opposite directions!

Step 5:
From here the block goes together like a simple Four Patch. Sew the patches together into two rows as shown in the picture below.

Step 6:
And press your seam allowances in opposite directions. I found it easier to press away from the Hourglass units as shown below.

Step 7:
Sew the two rows together and you’re done! Easy peasy!

Step 8:
Here you can see that I’ve pressed the seam allowances using the tweak/twirl/furl method. Pressing this way makes the block lay flatter and the seam allowances will nest together when sewing blocks together to make a quilt.

Layout Ideas
Here’s what the two-color block using similar colors as the tutorial looks like in a basic 4 x 4 quilt.

Here’s the same layout as above with sashing and cornerstones added.

This scrappy example is a basic 4 x 4 layout.


Another scrappy on-point layout with dark sashing and cornerstones and light setting triangles.
