Looking for a quick, classic quilt block with a bit of visual flair? The Bright Hopes block—also known as the Twist block—is a great choice! This easy 6″ block is made entirely from simple squares and rectangles, and it features a partial seam construction that’s much easier than it sounds. It’s a great introduction to this handy technique, and a fun way to build confidence.
Whether you’re digging into your scrap bin or planning your colors for a more structured look, Bright Hopes adds movement and charm to any quilt. In this tutorial, I’ll walk you through each step so you can stitch up a few—or a whole quilt’s worth—in no time.
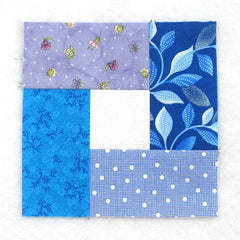
Fabric Requirements for a 6″ Bright Hopes quilt block:
- Light/White: 1 – 2.5″ square
- Assorted Prints: 4 – 2.5″ x 4.5″ rectangles

Sewing Directions:
Step 1:
I find it helpful to lay out the fabric pieces so I don’t get confused while putting them together. (I should have used the same fabrics as in the rest of the tutorial but I forgot to take a picture of this step before sewing the block together.)

Step 2:
- Now you can sew the right Assorted Prints rectangle to the center Light/White 2.5″ square with a partial seam. You can see how I’ve only sewn about half of the seam in the picture below. I used dark thread so that it shows up better for you.
- Press the seam allowance away from the Light/White 2.5″ square.
- (I’m making two blocks at the same time so I can get the sewing and pressing directions in the same picture.)

Step 3:
- Now you can sew another Assorted Prints rectangle to the bottom of the Step 2 unit as shown below.
- Press the seam allowance away from the Light/White 2.5″ square.

Step 4:
- Sew another Assorted Prints rectangle to the left of the Step 3 unit as shown below.
- Press the seam allowance away from the Light/White 2.5″ square.

Step 5:
- Sew another Assorted Prints rectangle to the top of the Step 4 unit as shown below.
- Press the seam allowance away from the Light/White 2.5″ square.

Step 6:
- Finally, finish sewing up that partial seam you started with.
- Press the seam allowance away from the center of the block as shown in the examples below.
- That went together fast!

Layout Ideas:
This is a basic 4 x 4 layout using scrappy blocks throughout.

If the above example is too busy for you, here’s a version with sashing and cornerstones. This gives the eye a place to “rest”.

If you prefer a planned color scheme, the blocks in this layout are all the same. It gives the quilt a basket weave effect. If you used all your pink scraps for the pink, blue scraps for the blue, etc. you could still have a scrappy quilt but with more of a planned look.

This version uses a scrappy Hourglass block as an alternating block. With more white space in the quilt, it calms down the scrappiness. I also like the diamond secondary design that appears.

Another alternating idea is to just use plain squares for the alternating block.

Here we have an on-point layout with dark sashing and cornerstones and light setting triangles.

Here’s an example of an on-point layout using the four-color, basket weave design shown previously.

This on-point version has a solid blue for an alternating block and the setting triangles.
