The Flight of Fancy quilt block is a striking 12″ traditional design that combines both a bold star and a subtle “X” pattern for a look that’s full of movement and charm. With its unique piecing, this block offers a fun twist on classic construction methods while still being approachable for confident beginners. The interplay of shapes gives your quilt top depth and interest, making this block a beautiful addition to a sampler quilt or a stunning repeat block design on its own.
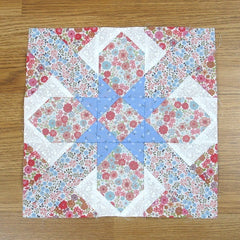
Fabric Requirements for a 12″ Flight of Fancy Quilt Block:
- Light/White: 4 – 4″ squares, and 8 – 2″ squares
- Dark 1/Red & Pink Print: 4 – 4″ squares
- Medium 1/Blue, Pink & Green Print: 4 – 5″ squares
- Medium 2/Soft Pink & Blue Print: 4 – 3.5″ x 5″ rectangles, and 1 – 3.5″ square
- Dark 2/Blue Print: 12 – 2″ squares

Sewing Directions:
Square in a Square Unit:
Step 1:
Using the Medium 2/Soft Pink & Blue 3.5″ square and four Dark 2/Blue Print 2″ squares, make a Square in a Square unit for the center of the block. You can find my tutorial for making a Square in a Square block at https://quiltembroiderypdf.com/how-to-sew-a-basic-square-in-a-square-block

Rectangle Snowball Unit:
Step 2:
Make four Rectangle Snowball units using the Medium 2/Soft Pink & Blue Print rectangles, Light/White 2″ squares, and the Dark 2/Blue Print squares. This unit goes together just like a Snowball block except that you use a rectangle for the base. Also note that the Light/White 2″ squares go on one end of the rectangle and the Dark 2/Blue Print 2″ squares go on the other end. You can find my tutorial for making a Square in a Square block at https://quiltembroiderypdf.com/how-to-sew-a-basic-snowball-block

Half-Square Triangle Units:
Step 3:
Using the Light/White 4″ squares and the Dark 1/Red & Pink Print 4″ squares, make 8 Half-Square Triangle (HST) units. Trim/square up the HSTs to 3.5″ square. You can find my tutorial for making HSTs at https://quiltembroiderypdf.com/how-to-sew-a-basic-half-square-triangle-block

Corner Units:
Step 4:
Mark a diagonal line perpendicular to the seam line on the back of the HST units you made in Step 3 like in the picture below.

Step 5:
Place one HST in a corner of a Medium 1/Blue, Pink & Green 5″ square as shown in the picture below and stitch on (or close to) marked line. To get a bonus patch, you can sew again about 1/2″ from the first stitching line. I’ve marked that stitching line so you can see what I’m talking about.

Step 6:
Using the picture below for a reference, match up the corners of the HST and press.

Step 7:
Unfold the HST and cut in between the two seam lines as shown in the picture below.

Step 8:
Here’s a picture showing the Corner unit half done plus the little 2.5″ bonus patch that you can use in some other project or maybe incorporate into a border for your quilt?

Step 9:
Repeat Steps 5 through 8 on the opposite corner of the Medium 1/Blue, Pink & Green 5″ square. Make sure to get the orientation of the HST right as shown in the picture below.
Repeat Steps 5 through 9 for a total of four Corner units.

Putting It All Together:
Step 10:
Using the picture below, lay out the center Square in a Square unit, the four Rectangle Snowball units, and the four Corner units. The block will go together just like a Nine Patch block would.

Step 11:
Sew the units together in three rows as shown below.

Step 12:
Press the seam allowances away from the Rectangle Snowball units as you can see in the picture below.

Step 13:
To complete the block, sew the three rows together and …

Step 14:
Press the seam allowances toward the center of the Flight of Fancy block as shown in the picture below. You’re done!

Layout Ideas:
Here’s the basic 4 x 4 layout with colors sort of similar to the tutorial.


In Conclusion:
I really had fun sewing this traditional Flight of Fancy quilt block. I did make a color change from original block because I wanted to have the star design show up in the center of the block. Traditionally, the Dark 2/Blue Print I used would have been the Medium 2/Soft Pink & Blue Print and no star shape would show.
So we have a star and cross design in the center and when blocks are sewn together, an X and an on-point square underneath the X would appear at the junction of the blocks. How fun to get a secondary design! I might have to do a post showing what a quilt of this block would look like. I also might have to actually make a quilt with this block!
I hope you enjoy the Flight of Fancy block as much as I did! If you liked this tutorial and want to see more like it, click HERE to sign up for my newsletter and receive a free PDF pattern called Chained Weathervane!
Happy Quilting!
Elaine
P.S. I did have to make a quilt pattern using this block. You can check it out by clicking Flight of Fancy.
P.P.S. Looking for more star blocks? Take a look at these blocks: https://quiltembroiderypdf.com/tagged/eight-pointed-star-blocks