Today we’re going to sew together this traditional quilt block called Morning Star that first appeared in the Ladies Art Company publication. It also appeared in Hearth & Home under the name State of Virginia. It’s pretty easy to piece and is so striking with the banded star design. Let’s get started!
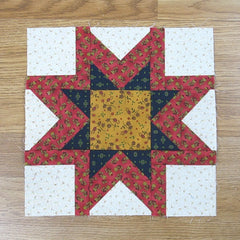
Fabric Requirements for a 12″ Finished Morning Star Quilt Block:
- Light/Ivory: 4 – 3.5″ squares, and 4 – 2.5″ x 4.5″ rectangles
- Medium 1/Red: 8 – 2.5″ squares, 4 – 2.5″ x 4.5″ rectangles, 4 – 1.5″ x 3.5″ rectangles, and 4 – 1.5″ x 4.5″ rectangles
- Medium 2/Gold: 1 – 4.5″ square
- Dark/Navy: 8 – 2.5″ squares

Sewing Directions:
Flying Geese Units:
Step 1:
Using the LIght/Ivory 2.5″ x 4.5″ rectangles and the Medium 1/Red 2.5″ squares, make four Flying Geese units as shown in the picture below. You can find my tutorial for making Flying Geese blocks at https://quiltembroiderypdf.com/how-to-sew-a-basic-flying-geese-block

Step 2:
Using the Medium 1/Red 2.5″ x 4.5″ rectangles and the Dark/Navy 2.5″ squares, piece together four Flying Geese units as shown below.

Step 3:
Pair up one Step 1 unit and one Step 2 unit and sew together so that the Medium 1/Red fabric makes a chevron design as shown in the picture below. Press seam allowance toward the Medium 1/Red-Dark/Navy unit. Repeat for a total of four units.

Corner Units:
Step 4:
Now we can work on the Corner units – easy peasy. Match up one Light/Ivory 3.5″ square and one Medium 1/Red 1.5″ x 3.5″ rectangle and sew together as shown below. Press the seam allowance toward the Medium 1/Red fabric. Repeat for a total of four units.

Step 5:
Now you can add a Medium 1/Red 1.5″ x 4.5″ rectangle to an adjacent side of the Step 4 unit as shown in the picture below. Again, press the seam allowance toward the Medium 1/Red fabric. Repeat for a total of four Corner units.

Putting It All Together:
Step 6:
From here the Morning Star (aka State of Virginia) block goes together like a simple Nine Patch block. Lay out the Flying Geese units, the Corner units, and the center Medium 2/Gold 4.5″ square as shown in the picture below.

Step 7:
Now you can sew the units together into three rows as shown in the picture below.

Step 8:
And press the seam allowances away from the Flying Geese units as shown below.

Step 9:
Now you can sew the three rows together and you’re all done except for the pressing!

Step 10:
Press the seam allowances. I pressed the seam allowances toward the center of the block so that when sewing blocks together, the seams would nest. However, I think the block would lay flatter if the seam allowances were pressed away from the center of the block. So it’s your choice how you want to press.

Layout Ideas:


