Today let’s sew together a Square and a Half quilt block that appeared in the Ladies Art Company publication. Traditionally, the Square and a Half block is made with just two colors – a light and a dark – but, of course, I had to add my own spin to it and use five colors! I’m not sure how it got the name “Square and a Half” but someone must have had a reason to name it that. It’s not very difficult but does have lots of pieces so let’s get started!
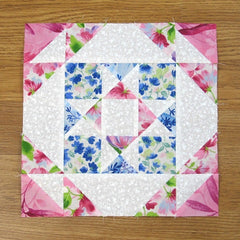
Fabric Requirements for a 10″ Finished Square and a Half Quilt Block:
- Light/White: 4 – 2.5″ x 6.5″ rectangles, 2 – 3.5″ squares, 2 – 3″ squares, and 1 – 2.5″ square
- Medium 1/Pink & White: 1 – 3.5″ square, 8 – 2.5″ squares
- Medium 2/Blue Tonal: 1 – 3.5″ square
- Medium 3/Blue & White: 4 – 2.5″ squares (I cut them wrong for the picture – that’s what I get for cutting fabric late at night – lol!)
- Dark/Pink Tonal: 2 – 3″ squares

Sewing Directions:
Half-Square Triangle Units:
Step 1:
Using the Light/White 3″ squares and the Dark/Pink Tonal 3″ squares, sew together four Half-Square Triangle units as shown in the picture below. You can find my method for making Half-Square Triangle blocks at: https://quiltembroiderypdf.com/how-to-sew-a-basic-half-square-triangle-block

Hourglass Units:
Step 2:
You can find my tutorial for making a basic Hourglass block at: https://quiltembroiderypdf.com/how-to-sew-a-basic-hourglass-or-quarter-square-triangle-block
Using the Light/White 3.5″ squares,the Medium 2/Blue Tonal 3.5″ square, and the Medium 1/Pink & White 3.5″ square make four Half-Square Triangle units as shown in the picture below. Do not trim these units. Press the seam allowance away from the Light/White fabric.

Step 3:
Match up one of the blue and white Half-Square Triangle units with one of the pink and white Half-Square Triangle units – right sides together and Light/White fabrics opposite each other – as shown in the picture below.

Step 4:
Using the picture below for reference, mark a diagonal line from corner to corner and perpendicular to the seam already sewn. Sew 1/4″ on both sides of the marked line and cut on the marked line. You will have two Hourglass units.

Step 5:
Using the picture below for a reference, open up your Step 4 unit and press the seam allowance. I have used the tweak/twirl/furl method here. Then you can trim the unit to a 2.5″ square. Repeat Steps 3 through 5 for a total of four Hourglass units.

Rectangle Units:
Step 6:
The Rectangle unit is made by snowballing two adjacent corners of the Light/White 2.5″ x 6.5″ rectangle with the Medium 1/Pink and White 2.5″ squares. You can follow along in the first picture shown below. First, you will mark a diagonal line from corner to corner on the back of the Medium 1/Pink and White square and sew just inside the marked line. Then fold the Medium 1/Pink and White square in half along the marked line, matching up the corner, and press. Open the square back up and trim off the excess seam allowance, then fold it back in place again.

Step 7:
Now you need to repeat Step 6 on the other end! Note the orientation of the Medium 1/Pink and White squares in the picture below.

Putting it all Together:
Step 8:
Lay out the Hourglass units, the Light/White 2.5″ square, and the Medium 3/Blue and White 2.5″ squares as shown in the picture below. Typical Nine Patch layout.

Step 9:
Sew the units into three rows and shown in the picture below.

Step 10:
And press the seam allowances away from the Hourglass units as shown below.

Step 11:
Now you can sew the three rows together as shown below and …

Step 12:
Press the seam allowance. You can press either way but you can see from the picture below that I pressed mine away from the center of the unit.

Step 13:
Now lay out the Step 12 unit you just made with the Rectangle units and the Half Square Triangle units as shown in the picture below.

Step 14:
Again, you will sew the units into three rows just like a Nine Patch block.

Step 15:
And press the seam allowances toward the Rectangle units as shown in the picture below.

Step 16:
Sew the three rows together and you’re done – except for …

Step 17:
The pressing. As you can see from the picture below, I’ve pressed the seam allowances away from the center of the block. This will make the seams nest together nicely when sewing blocks together.

Layout Ideas:


