Today let’s look at the Aunt Dinah quilt block. The traditional quilt block only uses two colors of fabric – light and dark – but of course I had to make it my own by using a light for the background, 2 medium tones, and a dark. I would consider this an easy intermediate block pattern to sew. Let’s get started!

Fabric Requirements for a 12″ Finished Aunt Dinah Quilt Block:
- Light/White: 1 – 5.5″ squares, 2 – 5″ squares, 1 – 4.5″ square, and 8 – 2.5″ squares (Oops! I got mixed up when cutting and the picture shows 2 – 5.5″ and 1 – 5″ squares!)
- Medium 1/Orange: 4 – 2.5″ squares
- Medium 2/Blue & Orange Print: 4 – 4.5″ squares
- Dark/Navy: 1 – 5.5″ square

Sewing Directions:
Corner Unit:
Step 1:
This unit is similar to the Birds in the Air quilt block. The only difference from the Birds in the Air block is the use of a Half Square Triangle instead of the Medium 1/Orange 2.5″ square. You can find a more detailed tutorial for making this unit at https://quiltembroiderypdf.com/birds-in-the-air-quilt-block-pattern.

Using a Medium 1/Orange 2.5″ square, 2 – Light/White 2.5″ squares, and a Medium 2/Blue & Orange Print 4.5″ square, sew together four Corner units as shown in the picture below.

This unit is also used in the Another Morning Star quilt block (which you can find by clicking here).
Quarter and a Half Unit:
Step 2:
I had to come up with a name for this unit and since it is similar to the Quarter Square and Half Square Triangle – Quarter and a Half it is!
Mark a diagonal line from corner to corner on the back of the Light/White 5.5″ square and match it up with the Dark/Navy 5.5″ square as shown below.

Step 3:
With right sides together, sew 1/4″ on each side of the marked line and then cut on the marked line as shown in the picture below. Open up and press the seam allowance toward the Dark/Navy fabric. You will have two Half Square Triangle units.

Step 4:
Now you can pair up one of the Step 3 units with one of the Light/White 5″ squares that you have marked with a diagonal line from corner to corner. They won’t be the same size but it doesn’t matter as we will be squaring them up later. In hindsight, I think it would be better to mark the line on the back of the Step 3 unit perpendicular to the seam line.

Step 5:
Now you can sew 1/4″ on both sides of the marked line and cut the unit apart on the marked line as shown below. Repeat Steps 4 and 5 for a total of four units.

Step 6:
Open up the units and press the seam allowance toward the Light/White large triangle. Square up the units to a 4.5″ square.

Putting It All Together:
Step 7:
Lay out the Corner units, the Quarter and a Half units, and the Light/White 4.5″ square in a typical Nine Patch block layout as shown in the picture below.

Step 8:
Now sew the units together into three rows as shown below and…

Step 9:
Press the seam allowances away from the Quarter and a Half units as shown in the picture below.

Step 10:
Now you can sew the three rows together and you’re done!

Step 11:
Except for the pressing! Press the seam allowances toward the center of the Aunt Dinah quilt block as shown in the picture below.

Layout Ideas:
Here’s the basic 4 x 4 layout. I love the secondary design that shows up!

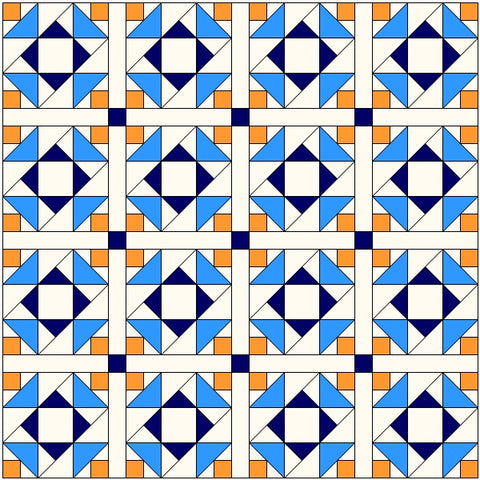
And this is the same 4 x 4 layout but with sashing and cornerstones added.
This example shows an on-point layout with every other block plain and plain setting triangles.

This on-point layout has a narrow sashing and cornerstones added plus plain setting triangles.

For a two-block quilt I added in a 6-Grid Chain block for the alternating blocks.

And for this design, a large Hourglass block is the alternating block.
