Today let’s sew together this traditional quilt block called Broken Window. Usually only two colors are used (a dark and a light) to create this block but I had to do my own thing and use five! Of course, other traditional blocks are called Broken Window – in fact, I have a tutorial for one of them at https://quiltembroiderypdf.com/broken-window-quilt-block-free-tutorial Let’s get started on this one!
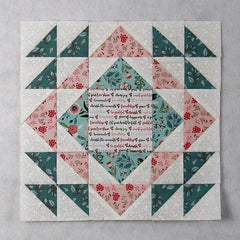
Fabric Requirements for a 12″ Finished Broken Window Quilt Block:
- Light/White: 1 – 4.5″ square (I’ve substituted a light print for this center square), 8 – 3″ squares, and 16 – 2.5″ squares
- Light/Pink: 4 – 2.5″ x 4.5″ rectangles, and 2 – 3″ squares
- Medium/Green: 4 – 2.5″ x 4.5″ rectangles
- Dark/Green: 6 – 3″ squares

Sewing Directions:
Flying Geese Units:
Step 1:
Using eight of the Light/White 2.5″ squares and the four Medium/Green 2.5″ x 4.5″ rectangles, sew together four Flying Geese patches as shown in the picture below. You can find the tutorial for piecing the basic Flying Geese block at https://quiltembroiderypdf.com/how-to-sew-a-basic-flying-geese-block

Step 2:
Now you can repeat Step 1 with the remaining Light/White 2.5″ squares and the four Light/Pink 2.5″ x 4.5″ rectangles as shown below.

Step 3:
Match up one Step 1 and one Step 2 units and sew together as shown in the picture below. Press the seam allowance toward the Light/Pink fabric.

Corner Units:
Step 4:
Using two of the Light/White 3″ squares and the Light/Pink 3″ squares, piece together four Half Square Triangles as shown in the picture below. You can find my tutorial for sewing a basic Half Square Triangle at https://quiltembroiderypdf.com/how-to-sew-a-basic-half-square-triangle-block. Press the seam allowances away from the Light/White fabric. Trim/square up the unit to 2.5″ square.

Step 5:
Next you will repeat Step 4 only using the remaining six Light/White 3″ squares and the six Dark/Green 3″ squares to create 12 Half Square Triangle units as shown below.

Step 6:
Using the picture below for a reference, layout one Step 4 unit and three Step 5 units. Then sew the units into two rows and press the seam allowances as shown. This is the same construction as a simple Four Patch block.

Step 7:
Next you need to sew the two rows together and press the seam allowance toward the Light/Pink Half Square Triangle as shown below.

Putting It All Together:
Step 8:
Lay out the Flying Geese units, the Corner units, and the center Light/White 4.5″ square as shown below.

In my block I changed out the center square for a light print.

Step 9:
From here the Broken Window block goes together like a basic Nine Patch
block. First you sew the units into three rows as shown in the picture below.

Step 10:
Then you can press the seam allowances away from the Flying Geese units as shown in the picture below.

Step 11:
All that’s left is to sew the three rows together, and

Step 12:
Press the seam toward the center of the block as shown in the picture below. You’re done!
