Let’s learn how to sew this lovely traditional quilt block. The name of this block is Pinwheel Quilt but I’m not sure why – there’s no pinwheel in it! I’ll show you an easy way to get those on-point four square patches to fit easily into the block. It appeared in the Kansas City Star and is a variation of the Cross and Chains quilt block that also appeared in the Kansas City Star. I’ve also done a few layouts which you’ll find at the end of the tutorial. Let’s get sewing!
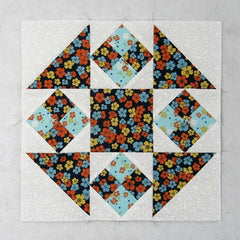
Fabric Requirements for a 12″ Finished Pinwheel Quilt Block:
- Light/White: 2 – 5″ squares, and 16 – 2.5″ squares
- Medium: 2 – 5.5″ squares
- Dark: 2 – 5.5″ squares, 2 – 5″ squares, and 1 – 4.5″ squares (forgot to put that one in the picture!)

Sewing Directions:
Corner Units:
Step 1:
Using the Light/White 5″ squares and Dark 5″ squares, sew together four Half Square Triangle patches as shown in the picture below. Trim/square up the units to 4.5″ square. You can find my tutorial for making Half Square Triangles at https://quiltembroiderypdf.com/how-to-sew-a-basic-half-square-triangle-block

On-Point Four Patch Units:
Step 2:
Using the two Medium 5.5″ squares and the two Dark 5.5″ squares, piece together four Hourglass units like the ones shown in the picture below. Trim/square up the units to 4.5″ square. You can find the basic Hourglass tutorial at https://quiltembroiderypdf.com/how-to-sew-a-basic-hourglass-or-quarter-square-triangle-block

Step 3:
Going from top to bottom, left to right, use the picture below for reference for these next steps:
- Mark a diagonal line from corner to corner on the back of two Light/White 2.5″ squares. Then place on a Step 2 Hourglass unit and stitch along the marked line.
- Fold the Light/White 2.5″ squares along the stitching, match the corners, and press
- Unfold the Light/White 2.5″ squares and trim away the seam allowance
- Refold

Step 4:
Repeat Step 3 for a total of four units.

Step 5:
Repeat Step 3 with the other two corners of the Hourglass units as shown in the picture below.
- Mark a diagonal line from corner to corner on the back of two Light/White 2.5″ squares. Then place on a Step 2 Hourglass unit and stitch along the marked line.
- Fold the Light/White 2.5″ squares along the stitching, match the corners, and press
- Unfold the Light/White 2.5″ squares and trim away the seam allowance
- Refold

Step 6:
Repeat Step 5 for a total of four On-Point Four Patch units as shown below.

Putting It All Together:
Step 7:
Lay out the Corner units, the On-Point Four Patch units, and the Dark 4.5″ square as shown in the picture below. From here the Pinwheel Quilt block goes together like a basic Nine Patch block.

Step 8:
Now you can sew the units into three rows as shown in the picture below.

Step 9:
Next, press the seam allowances away from the On-Point Four Patch units as shown below.

Step 10:
Sew those three rows together and…

Step 11:
Press the seam allowances toward the center of the block. You’re done!

Layout Options:
Here’s a basic simple 4 x 4 layout. It always amazes me how different a block looks when sewn into a quilt.

In this example, I’ve simply added sashing and cornerstones so each individual block shines.

Next I substituted a Shoo Fly block for every other block in this alternating layout.

In this scrappy example I used a simple Snowball block as the alternating block.

Of course, I had to see what it looked like on point. This example has narrow (1″) sashing and cornerstones plus the background fabric extends into the setting triangles.


