Today I’d like to show you how to create a Betty’s Delight quilt block without any Y-seams. This traditional block is great for a scrappy quilt too! At the end I’ll show some different block layout options too. Let’s get sewing!
Update: I’ve also added quilt layouts at the end.

Fabric Requirements for a 12″ Finished Betty’s Delight Quilt Block:
- Light/Gray: 4 – 2.5″ squares, 4 – 2.5 x 4.5″ rectangles, and 4 – 2.5″ x 6.5″ rectangles
- Dark/Purple: 4 – 2.5″ squares, 4 – 2.5 x 4.5″ rectangles, and 4 – 2.5″ x 6.5″ rectangles (It’s so dark, it looks black in the pictures!)

Sewing Directions:
Step 1:
Match up a Dark/Purple 2.5″ square with a Light/Gray 2.5″ x 4.5″ rectangle and sew together as shown in the picture below.

Step 2:
Press the seam allowance toward the Dark/Purple square as shown below.

Step 3:
Now sew a Light/Gray 2.5″ x 6.5″ rectangle to the Step 2 unit as shown in the picture below. It’s an odd-looking unit, isn’t it?

Step 4:
And press the seam allowance toward the Dark/Purple fabric as shown below. Repeat Steps 1 through 4 for a total of 4 units.

Step 5:
Repeat Steps 1 through 4 except switch the Light/Gray and Dark/Purple fabrics around. And…

Step 6:
Make sure you still press toward the Dark/Purple fabrics as shown in the picture below.

Step 7:
Using the picture below for reference, draw a line on the back of either the Step 4 or Step 6 units. (I’m showing the Step 6 unit but it turned out to be easier to use the Step 4 unit.)

Step 8:
Pair up a Step 4 and a Step 6 unit.

Step 9:
Place right sides together and nest the seam allowances. Then sew just to the right of the marked line as shown in the picture. Sewing just to the side of the line allows for the thickness of the fabric when you open up the unit.
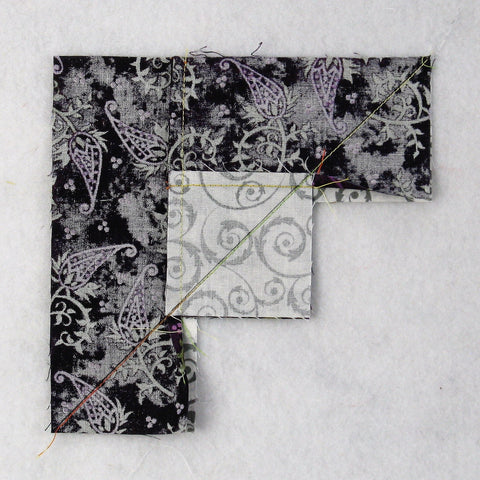
Step 10:
Now you can trim away the excess fabric in the seam allowance.

Step 11:
Open it up and…

Step 12:
Press the seam allowance toward the darker side as shown in the picture below. Repeat Steps 8 through 12 for a total of four units.

Wow, that’s a lot of steps for such a simple-looking unit!
Putting It All Together:
Step 13:
Lay out the Step 12 units as shown in the picture below.

Step 14:
From here the block goes together like a simple Four Patch block. Sew the units into two rows.

Step 15:
And press the seam allowances as shown in the picture below. I’ve pressed the seam allowances so that all the seams that meet in the center of the block go in the same direction (in my case counter-clockwise).

Step 16:
All that’s left is to sew the two rows together and…

Step 17:
Press the seam allowance. Hopefully you can see in the picture below that I’ve used the tweak/twirl/furl method for pressing so that all those seams are pressed in a counter-clockwise direction.

Layout Options:
There are a couple of different ways you could lay out these units although they won’t be a true Betty’s Delight block. This one is very similar to the Grandmother’s Own block that I did a tutorial on which you can find at https://quiltembroiderypdf.com/grandmothers-own-quilt-block-tutorial

This one is pretty interesting too!
