Mrs. Keller is a variation of the beloved Nine Patch quilt block. This scrappy version is a stash buster for sure. The traditional design is made with just a light and a dark colored fabric but you could switch it up however you want. Let’s get sewing!
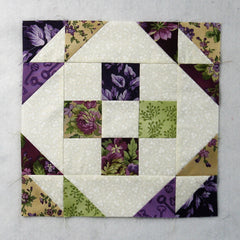
I now have a PDF pattern of this block in two sizes available in my Etsy shop if you prefer to have a printed pattern. Check it out by clicking this link: MRS KELLERS NINE PATCH
Fabric Requirements for a 10″ Finished Mrs. Keller’s Nine Patch Quilt Block:
- Light/Ivory: 4 – 2.5″ x 6.5″ rectangles, 2 – 3″ squares, and 5 – 2.5″ squares
- Assorted Prints: 2 – 3″ squares, and 12 – 2.5″ squares

Sewing Directions:
Half Square Triangle Units:
Step 1:
Using the two Light/Ivory 3″ squares and the two Assorted Prints 3″ squares, sew together four Half Square Triangle (HST) units as shown in the picture below. Trim/square up the units to 2.5″ square. You can find my tutorial for making a basic Half Square Triangle at https://quiltembroiderypdf.com/how-to-sew-a-basic-half-square-triangle-block

Nine Patch Unit:
Step 2:
Lay out the five Light/Ivory 2.5″ squares and four Assorted Prints 2.5″ squares as shown below.

Step 3:
Piece the squares into a typical Nine Patch block. You can find the tutorial for making a Nine Patch quilt block at https://quiltembroiderypdf.com/how-to-sew-a-basic-nine-patch-quilt-block

Rectangle Unit:
Step 4:
The Rectangle unit is constructed just like a Flying Geese block except that a longer rectangle is used. First you draw a diagonal line from corner to corner on the back of the remaining Assorted Prints 2.5″ squares and sew them to each end of a Light/Ivory 2.5″ x 6.5″ rectangle (top image). Then match up the corners, press (2nd image), and trim the seam allowance (3rd image) to create the Rectangle unit (bottom image).

Putting It All Together:
Step 5:
Lay out the Half Square Triangle units, the Nine Patch unit, and the Rectangle units as shown in the picture below.

Step 6:
From here the block goes together like an uneven Nine Patch block. First you sew the units into three rows like in the picture below.

Step 7:
Press the seam allowances toward the Rectangle units as shown below.

Step 8:
Sew the three rows together as shown in the picture below and…

Step 9:
Press the seam allowances away from the center of the block. You’re done!

Layout Options:
Here’s just a plain layout 4 x 4 with scrappy purple blocks.

The same as the one above but with cornerstones and sashing added. What a difference!

Here’s an example done with just a light and a dark.

So with two darks and a light, this is what it might look like:

Put that same quilt on point. It always amazes me how different an on point layout looks!
