This Crossroads Star variation is easy to sew together. Plus, it creates another star when sewn into a quilt!
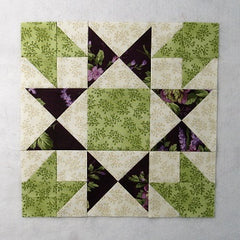
I had a lot of fun playing around with this block. I’ll show some of the other colorings and layout options toward the end of the tutorial.
Fabric Requirements for a 12″ Finished Crossroads Star Quilt Block:
- Light/Ivory: 2 – 5.5″ squares, 4 – 3″ squares and 4 – 2.5″ squares
- Medium/Green: 1 – 4.5″ square, 4 – 3″ squares and 4 – 2.5″ squares
- Dark/Purple: 2 – 5.5″ squares

Sewing Directions:
Half Square Triangle Units:
Step 1:
Using the Light/Ivory 3″ squares and the Medium/Green 3″ squares, sew together eight Half Square Triangle units like the ones shown in the picture below. Trim/square up the units to 2.5″ square. You will find my tutorial for sewing a basic Half Square Triangle block at https://quiltembroiderypdf.com/how-to-sew-a-basic-half-square-triangle-block

Hourglass Units:
Step 2:
Now you can make four Hourglass units using the Light/Ivory 5.5″ squares and the Dark/Purple 5.5″ squares as shown in the picture below. Trim/square up the units to 4.5″ square. You can find a tutorial for making a basic Hourglass (or Quarter Square Triangle) unit at https://quiltembroiderypdf.com/how-to-sew-a-basic-hourglass-or-quarter-square-triangle-block

Corner Units:
Step 3:
Lay out two Step 1 Half Square Triangle units, a Light/Ivory 2.5″ square, and a Medium/Green 2.5″ square as shown below.

Step 4:
Next you can sew the patches together like a basic Four Patch block. First, sew them into two rows and press the seam allowances toward the 2.5″ squares as shown in the picture below.

Step 5:
Next, sew the two rows together and press the seam allowances. You can see from the picture below that I’ve used the tweak/twirl/furl method of pressing. Repeat Steps 3 through 5 for a total of four Corner units.

Putting It All Together:
Step 6:
Lay out the Corner units, the Hourglass units, and the Medium/Green 4.5″ square as shown in the picture below.

Step 7:
From here the block goes together just like a Nine Patch block. Sew the units into three rows as shown below.

Step 8:
Press the seam allowances away from the Hourglass units as shown below.

Step 9:
Sew the three rows together, and…

Step 10:
Press the seam allowances toward the center of the block as shown in the picture below. Finished!

Color Placement and Layout Options:
Original Placement:
The image below shows the traditional way the block is made. The Corner units are where I made changes. This is a nice block too.

Here’s an example of a quilt made with the traditional block. I think the red star gets kind of lost.

But if you add sashing and cornerstones, the red star appears again.

Today’s Tutorial:
Here’s a quilt layout using this tutorial’s variation of the Crossroads Star. Once again the purple star gets lost.

My favorite layout is with the sashing and cornerstones like the one below. You still get a green star but the purple star shows up too.

Variation 3:
If you take the traditional block and just rotate the Corner units, this is the look you get:


More Coloring Options:


More Layout Options:

