This Fox and Geese block is a great block to practice making flying geese blocks. It is a good scrappy or planned block that looks wonderful in a quilt! Let’s get started!

Fabric Requirements for a 16″ Finished Fox and Geese Quilt Block:
- Light/Ivory: 2 – 5″ squares, and 32- 2.5″ squares
- Light/Print: 1 – 8.5″ square
- Assorted Prints: 2 – 5″ squares, and 16 – 2.5″ x 4.5″ rectangles

Sewing Directions:
Corner Unit:
Step 1:
Using the Light/Ivory 5″ squares and the Assorted Prints 5″ squares, sew together four half square triangles (HST). Press the seam allowance toward the Light/Ivory fabric and trim the HSTs to 4.5″ square as shown in the picture below. You can find a detailed tutorial for making HSTs at https://quiltembroiderypdf.com/how-to-sew-a-basic-half-square-triangle-block

Flying Geese Units:
Step 2:
Using the 16 Assorted Prints 2.5″ x 4.5″ rectangles and the 32 Light/Ivory 2.5″ squares, sew together 16 flying geese patches like the ones shown in the picture below. You will find a tutorial showing my no-trim method for making flying geese blocks at https://quiltembroiderypdf.com/how-to-sew-a-basic-flying-geese-block

Step 3:
Sew four of the Step 2 units together and press the seam allowances away from the center points as shown below. Repeat for a total of four Flying Geese units.

Putting It All Together:
Step 4:
Lay out the Corner units, Flying Geese units, and the Light/Print 8.5″ square as shown in the picture. Notice that the points of the Flying Geese units chase each other around the center square.
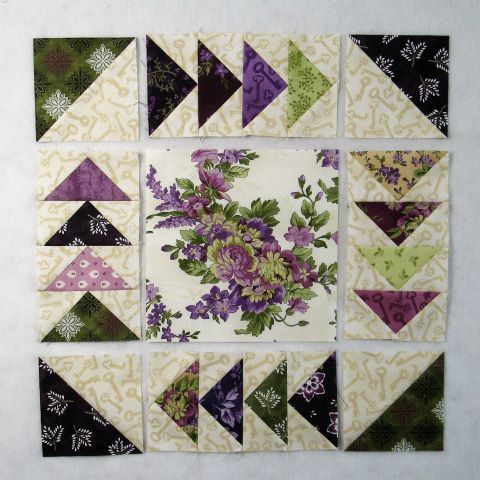
I have seen other layout options for this block with the Flying Geese points going in different directions. I felt this layout looked the best when placed in a quilt.
Step 5:
Sew the units into 3 rows as shown below.

Step 6:
Press the seam allowances away from the Flying Geese units as shown in the picture below.

Step 7:
Sew the three rows together and…

Step 8:
Press the seam allowances toward the center of the block as shown below. All done!
