Let’s look at this cute star block called Starshadow. It is fairly easy to sew together – just lots of pieces! This block first appeared in the Quilter’s Newsletter publication and is a lovely traditional block. Let’s get sewing!
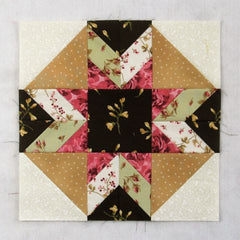
Fabric Requirements for a 12″ Finished Starshadow Quilt Block:
- Light/Ivory: 2 – 5″ squares
- Medium/Tan: 2 – 5″ squares
- Light/Print: 4 – 2.5″ x 4.5″ rectangles
- Medium/Green: 4 – 2.5″ x 4.5″ rectangles
- Dark/Pink: 8 – 2.5″ squares
- Dark/Brown: 1 – 4.5″ square, and 8 – 2.5″ squares

 Sewing Directions:
Half Square Triangles:
Step 1:
Using the Light/Ivory 5″ squares and Medium/Tan 5″ squares, sew together four Half Square Triangle units as shown in the picture below. You can find my step-by-step method for making a Half Square Triangle block at https://quiltembroiderypdf.com/how-to-sew-a-basic-half-square-triangle-block

Green Diagonal Stripe Units:
Step 2:
We’ll basically be making a modified Flying Geese unit – the position of the squares is the only difference. Draw a diagonal line from corner to corner on the back of a Dark/Pink 2.5″ square and a Dark/Brown 2.5″ square. Match these up with a Medium/Green 2.5″ x 4.5″ rectangle as shown below.

Step 3:
- Sew the Dark/Brown square to the Medium/Green rectangle along the marked line (top left image). Be sure to have the same orientation as in the picture.
- Then do the same with the Dark/Pink square on the opposite corner of the Medium/Green rectangle (top right image).
- Match up the corners of the squares and press (bottom left image).
- Trim away the excess seam allowances (bottom right image).

Step 4:
Repeat Steps 2 and 3 for a total of four Green Diagonal Stripe units.

Light/Print Diagonal Stripe Units:
Step 5:
Using the remaining Dark/Pink 2.5″ squares and Dark/Brown 2.5″ squares, along with the Light/Print 2.5″ x 4.5″ rectangles, repeat Steps 2 through 4 to make four Light/Print Diagonal Stripe units. However, the orientation of the diagonal stripe is going in the opposite direction. Use the picture below for a reference.

Chevron Units:
Step 6:
Match up one Step 4 and one Step 5 unit as shown in the picture below.

Step 7:
- Sew the two units together (top image).
- And press the seam allowance. You can either press to one side (bottom left image) or press open (bottom right image).

Step 8:
Repeat Step 7 for a total of four Chevron units.

Putting It All Together:
Step 9:
Now you can lay out the Half Square Triangle units, the Chevron units, and the Dark/Brown 4.5″ square as shown in the picture below. From here the block goes together like a typical Nine Patch block.

Step 10:
First, sew the units into three rows as shown below.

Step 11:
Press the seam allowances away from the Chevron units.

Step 12:
Sew the three rows together, and…

Press the seam allowances toward the center of the block. You’re done!

Layout Options:
Here’s the basic 4 x 4 layout. Notice the secondary designs that appear!

And here it is with sashing and cornerstones:

Here’s an on-point layout with every other block being the Light/Ivory color:

And here’s another on-point layout with sashing and cornerstones:

Now let’s look at some alternating block options.
Here’s one with an alternating large Hourglass block.

And here’s one with a custom alternating block:
