This variation of an Eight Pointed Star quilt block goes together quickly and makes a nice secondary design in a quilt. Lots of star blocks are called Eight Pointed Star – this one could be considered a variation of the Ohio Star block as well. Let’s get sewing!
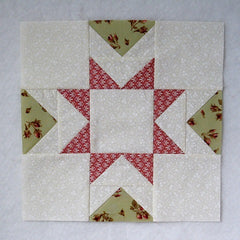
Fabric Requirements for a 12″ Finished Eight Pointed Star Quilt Block:
- Light/Ivory: 5 – 4.5″ squares, 4 – 2.5″ x 4.5″ rectangles, and 8 – 2.5″ squares
- Medium/Pink: 8 – 2.5″ squares
- Medium/Green: 4 – 2.5″ x 4.5″ rectangles

Update: I now have this tutorial available as a downloadable PDF in my Etsy shop. Click on this link to check it out: Eight Pointed Star
Sewing Directions:
Flying Geese Units:
Step 1:
Using the Medium/Green 2.5″ x 4.5″ rectangles and Light/Ivory 2.5″ squares, sew together four Flying Geese blocks as shown in the picture below. You can find my easy, no-trim method for making Flying Geese blocks at https://quiltembroiderypdf.com/how-to-sew-a-basic-flying-geese-block

Step 2:
Repeat Step 1 using the Light/Ivory 2.5″ x 4.5″ rectangles and Medium/Pink 2.5″ squares as shown below.

Step 3:
Now match up a Step 2 and a Step 3 Flying Geese and sew together as shown below. Press the seam allowance toward the Ivory/Pink unit.

Step 4:
Repeat Step 3 for a total of four Flying Geese Units. We’re now ready to sew the block together.


Putting It All Together:
Step 5:
Lay out the five Light/Ivory 4.5″ squares and the four Flying Geese units as shown in the picture below. From here the block goes together like a basic Nine Patch block.

Step 6:
Sew the patches together into three rows as shown below.

Step 7:
Press the seam allowances toward the Light/Ivory 4.5″ squares as shown in the photo below. Pressing this way helps the block lay nice and flat when completed.

Step 8:
Sew those three rows together to complete the block! So speedy!

Step 9:
All that’s left is to press the seam allowances away from the center of the block.

Layout Options:
Here’s an example of a basic 4 x 4 layout. I like the diamond shapes that form between the stars and the Light/Ivory squares would be a great place for a little fancy quilting!

In this example, I’ve added sashing and cornerstones for a different look.

For this example, I alternated the block with a large Half Square Triangle block. I like this design!

Here I’ve alternated with a chain block done in complementary colors. Looks pretty good.

Now on to some on-point layouts. Here’s the basic one. It always amazes me with how an on-point layout can look so different.

For this top, I added narrow sashing, cornerstones, and setting triangles in the Medium/Green color for something a little different.
