Hello, quilting enthusiasts! Today, we’re exploring the captivating Christmas Star quilt block. This traditional 12″ block might seem complex at first glance, but I assure you, it’s more straightforward than you might think. In this tutorial, I’ll guide you through the steps to piece together its intricate units seamlessly. Originating from the Kansas City Star, this block is a piece of quilting history. So, grab your fabrics, and let’s dive into the creation of this beautiful design!
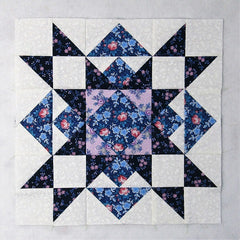
Fabric Requirements for a 12″ Finished Christmas Star Quilt Block:
- Light/White: 4 – 3″ squares, and 24 – 2.5″ squares (I couldn’t count so there are only 16 squares in the picture – lol!)
- Medium/Purple: 4 – 2.5″ squares
- Medium/Blue: 1 – 4.5″ square, and 8 – 2.5″ x 4.5″ rectangles
- Dark/Blue: 4 – 3″ squares, and 8 – 2.5″ squares

Sewing Directions:
Corner Units:
Step 1:
Using the Light/White 3″ squares and the Dark/Blue 3″ squares, sew together eight Half Square Triangle units as shown in the picture below. Trim/square up the units to 2.5″ square. You can find a tutorial for my method of making Half Square Triangle blocks at https://quiltembroiderypdf.com/how-to-sew-a-basic-half-square-triangle-block

Step 2:
Lay out two of the Step 1 Half Square Triangle units with two of the Light/White 2.5″ squares as shown in the picture below.

Step 3:
Sew the Step 2 units into two rows as shown below. Press the seam allowances toward the Light/White 2.5″ squares.

Step 4:
Now you can sew the two rows together and press the seam allowance as shown in the picture below. Repeat for a total of four Corner Units.

Combination Flying Geese Units:
Step 5:
Sew together eight Flying Geese units using the Light/White 2.5″ squares and the Medium/Blue 2.5″ x 4.5″ rectangles as shown in the picture below. You can find my method for making a Flying Geese block at https://quiltembroiderypdf.com/how-to-sew-a-basic-flying-geese-block Set aside four of these units.

Step 6:
Now you can sew what I call a Double Flying Geese unit for lack of a better name. Basically, you will be using the same steps for a basic Flying Geese unit. Draw a diagonal line from corner to corner on the back of the eight Dark/Blue 2.5″ squares. Using the photo below for reference, sew one of the Dark/Blue 2.5″ squares onto one of the Step 5 Flying Geese units (top example). Match up the corners of the Dark/Blue 2.5″ square and press (second example). Open the Dark/Blue 2.5″ square and trim off the seam allowance (third example). Refold the Dark/Blue (fourth example).

Step 7:
Now you just have to repeat Step 6 on the other end! Repeat Steps 6 and 7 for a total of four units.

Step 8:
Sew a Step 5 unit to a Step 7 unit as shown in the picture below. Press the seam allowance toward the Step 5 unit. Repeat for a total of four Combination Flying Geese units.

Center Unit:
Step 9:
The Center unit is simply a Square in a Square block. Using the Medium/Blue 4.5″ square and the four Medium/Purple 2.5″ squares, make a Square in a Square unit as shown in the picture below. You can find the Square in a Square tutorial at https://quiltembroiderypdf.com/how-to-sew-a-basic-square-in-a-square-block

Putting It All Together:
Step 10:
Lay out the Corner units, Combination Flying Geese units, and the Center unit as shown in the picture below. From here, the Christmas Star quilt block goes together like a simple Nine Patch block.

Step 11:
Now you can sew the units into three rows as shown below and …

Step 12:
Press the seam allowances away from the Combination Flying Geese units as you can see in the picture below.

Step 13:
And now you sew the three rows together to complete the block!

Step 14:
I pressed the seam allowances toward the center of the Christmas Star quilt block as you can see in the photo below. This way will make it easier to sew blocks together as the seams will nest. But you can press in whatever direction you prefer.

Layout Ideas:
Here’s your basic 4 x 4 layout with similar colors as the tutorial:


