The Green Mountain Star quilt is a lovely large quilt block that makes for a beautiful quilt. Also known as Aunt Mary’s Star the block uses snowballed rectangles, Hourglass and Flying Geese patches and goes together quickly! Since the block is large, you don’t need to make too many blocks for a quilt top! Plus I’ll show you some layout ideas. Let’s get started!
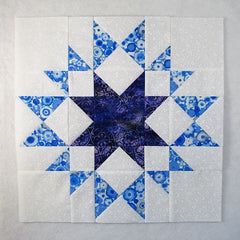
Fabric Requirements for a 16″ Finished Green Mountain Star Quilt Block:
- Light/White: 2 – 5.5″ squares, 4 – 4.5″ squares, 12 – 2.5″ x 4.5″ rectangles, and 4 – 2.5″ squares
- Medium/Blue: 2 – 5.5″ squares, and 8 – 2.5″ squares
- Dark/Purple: 1 – 4.5″ square, and 8 – 2.5″ squares

Sewing Directions:
Half Flying Geese Units:
Step 1:
This unit is the first half of a Flying Geese block. You can see the first four steps in the picture below. Mark a diagonal line from corner to corner on the back of a Medium/Blue 2.5″ square.
- Place the Medium/Blue square on a corner of a Light/White 2.5″ x 4.5″ rectangle and sew along the marked line (or close to the marked line).
- Match up the corners of the Medium/Blue square and press.
- Trim away the excess seam allowance.
- Refold the Medium/Blue triangle.

Step 2:
Now repeat Step 1 using another Light/White 2.5″ x 4.5″ rectangle and a Medium/Blue 2.5″ square only changing the corner being used and the direction of the sewing line.

Step 3:
Repeat Step 1 and Step 2 for a total of four units each. Here’s a picture of all eight of the units.

Corner Units:
Step 4:
Lay out a Light/White 4.5″ square, a Light/White 2.5″ square, one Step 1 and one Step 2 unit as shown in the picture below.

Step 5:
Sew the patches into two rows and press the seam allowances toward the Light/White squares as shown below.

Step 6:
Sew the two rows together and press the seam allowance way from the Light/White 4.5″ square to complete the unit.

Step 7:
Repeat Steps 4 – 6 for a total of four Corner units as shown in the picture below.

Hourglass Units:
Step 8:
Using a Light/White 5.5″ square and a Medium/Blue 5.5″ square, sew an Hourglass unit. For a super detailed tutorial for making a basic Hourglass block, check out the tutorial at https://quiltembroiderypdf.com/how-to-sew-a-basic-hourglass-or-quarter-square-triangle-block.
In the picture below you can see the first steps.
- Mark a diagonal line on the back of the Light/White square.
- Match it up right sides together with the Medium/Blue square
- Sew 1/4″ on each side of the marked line.
- Cut along the marked line.

Step 9:
- Open up the Step 8 units and press the seam allowances toward the Medium/Blue fabric.
- Mark a diagonal line perpendicular to the seam line from corner to corner on the back of one of the units.
- Match up the two units with seam allowances nesting and sew 1/4″ on each side of the marked line.
- Cut along the marked line.

Step 10:
Open up the Step 9 units and press the seam allowances. You can see that I’ve used the tweak/twirl/furl method of pressing. Trim/square up the units to 4.5″ square.

Step 11:
Repeat Steps 8 – 10 for a total of four Hourglass units as shown below.

Flying Geese Units:
Step 12:
Using a Light/White 2.5″ x 4.5″ rectangles and Dark/Purple 2.5″ squares, make a Flying Geese unit. You can find my detailed tutorial using my no-trim method for making perfect Flying Geese at https://quiltembroiderypdf.com/how-to-sew-a-basic-flying-geese-block. In the picture below you can see the first four steps.

Step 13:
And here you can see the last four steps.

Step 14:
Repeat Steps 13 and 14 for a total of four Flying Geese units like the ones shown below.

Middle Units:
Step 15:
Using the picture below for reference, sew together an Hourglass unit and a Flying Geese unit together. Press the seam allowance toward the Hourglass unit.

Step 16:
Repeat Step 15 for a total of four Middle units like these.

Putting It All Together:
Step 17:
Lay out the Corner units, the Middle units, and the Dark/Purple 4.5″ square as shown in the picture below. From here the block goes together like a typical Nine Patch quilt block.

Step 18:
Sew the units into three rows as shown below. Some of those seams are a little tricky so just take your time to get them lined up correctly.

Step 19:
Press the seam allowances away from the Middle units as shown in the picture below.

Step 20:
All that’s left is to sew the three rows together and…

Step 21:
Press the seam allowances toward the center of the block!

Optional Coloring:
I did find a variation of this block done in three colors plus a background. Here’s what that would look like:

Layout Ideas:
Here’s the basic 4 x 4 layout using similar colors to the block I made.

Jazz it up with some sashing and cornerstones:

How about some holiday colors with an alternating chain block?

And here’s the three-color block with a different alternating chain block. I like the fall colors!

Of course I had to do a scrappy example. This is an on-point layout with solid background for the setting triangles.

Another scrappy on-point layout with an alternating block. This is my favorite!
