Today let’s learn how to piece the Treasure Box quilt block. This traditional block can look so different just by changing the color placement – lots of fun to play around with! It uses only Square in a Square and Flying Geese units plus four squares. Let’s get started!
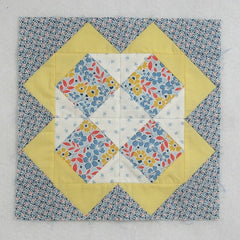
Fabric Requirements for a 12″ Finished Treasure Box Quilt Block:
- Light/White: 12 – 2.5″ squares
- Medium/Yellow: 8 – 2.5″ x 4.5″ rectangles, and 4 – 2.5″ squares
- Medium/Blue: 4 – 4.5″ squares
- Dark/Blue: 20 – 2.5″ squares

Sewing Directions:
Square in a Square Units:
Step 1:
- Mark a diagonal line from corner to corner on the back of a Medium/Yellow 2.5″ square.
- Place the Medium/Yellow square on one corner of a Medium/Blue 4.5″ square, right sides together, and sew close to the marked line in what will be the seam allowance. (top left image)
- Match up the corners of the small square and press.(top right image)
- Open the small square up and trim .25″ from stitching. (bottom left image)
- Refold the Medium/Yellow square. (bottom right image)

Step 2:
Repeat Step 1 on the remaining corners of the Medium/Blue 4.5″ square only using the Light/White 2.5″ squares as shown below.
Repeat for a total of four Square in a Square units.
You can find a detailed tutorial for making a basic Square in a Square block at https://quiltembroiderypdf.com/how-to-sew-a-basic-square-in-a-square-block

Flying Geese Units:
Step 3:
Using 16 Dark/Blue 2.5″ squares, and the eight Medium/Yellow 2.5″ x 4.5″ rectangles, sew together eight Flying Geese units. For a detailed tutorial of my no-trim method for making perfect Flying Geese blocks check out https://quiltembroiderypdf.com/how-to-sew-a-basic-flying-geese-block. The picture below shows the first four steps.
- Mark a diagonal line from corner to corner on the back of the Dark/Blue 2.5″ squares.
- Sew a Dark/Blue 2.5″ square to the Yellow rectangle along the marked line (top image). Note the orientation of the marked line.
- Match the corners of the Dark/Blue square and press (second image).
- Open the small square up and trim .25″ from stitching (third image).
- Refold (bottom image).

Step 4:
Repeat Step 3 on an adjacent corner.

Step 5:
Repeat Steps 3 and 4 for a total of eight Flying Geese units like what is shown in the picture below.

Putting It All Together:
Step 6:
Lay out the Square in a Square units, the Flying Geese units, and the remaining four Dark/Blue 2.5″ squares as shown in the picture below.
There are two different ways to sew the units together. I’m going to demonstrate the four rows way.
You could also sew the four Square in a Square units together and make four sets of the Flying Geese units and then sew together in three rows. I think that may be an easier way to sew them together.

Step 7:
Sew the units together in four rows as shown in the picture below.

Step 8:
I pressed the seams open as you can see in the picture below. You could press the seam allowances in opposite directions row by row.

Step 9:
Sew the four rows together. Because I pressed my seams open, it was harder to match up the seams. Just take your time. My seams and points aren’t perfect but that’s not glaringly obvious!

Step 10:
Once again I pressed my seams open but you can press however you wish.

Layout Ideas:
Here’s the basic 4 x 4 layout using similar colors as the tutorial. I like the dark diamonds that appear.

This example is the same 4 x 4 layout but with sashing and cornerstones added.

This version has a simple chain alternating with the Treasure Box. I like how the chain accentuates the main block.

This is an example of what an on-point layout could look like. The light fabric is also used for the setting triangles.

This is the same on-point layout as the previous one just with narrow sashing and cornerstones added.

Back to an alternating block layout. Here the alternating block is a square in a square in a square, etc. I think it complements the main block really well.

For this example, I changed the color placement around and used a light color for a background fabric.

This is an on-point layout with an alternating chain block that continues into the setting triangles. Very pretty!
