Welcome to the Union Square quilt block tutorial! This timeless design is a traditional pieced block that brings together a harmonious combination of squares, half-square triangles, and hourglass units.
With its classic structure and versatility, the Union Square block is perfect for showcasing your favorite color combinations or playing with bold contrasts. Whether you prefer soft pastels or rich jewel tones, this block offers endless opportunities to create a stunning quilt. Let’s dive in and piece together this beautiful block step by step!
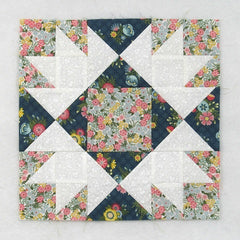
Fabric Requirements for a 12″ Finished Union Square Quilt Block:
- Light/White: 2 – 5.5″ squares, 4 – 3″ squares, and 4 – 2.5″ squares
- Medium Aqua: 4 – 3″ squares, 4 – 2.5″ squares, and 1 – 4.5″ square (that I forgot to include in the picture!)
- Dark Green: 2 – 5.5″ squares
- To make 8 blocks you will need approximately 3/4 yard of the white, 5/8 yard of the medium, and 3/8 yard of the dark.

If you would like a printable PDF download of this tutorial, you can buy it in my Etsy shop. This is totally optional. Click the button below to learn more.

Sewing Directions:
Half Square Triangles:
Step 1:
Using a Light/White 3″ square and a Medium Aqua 3″ square, make Half Square Triangle units as shown. Here are the steps corresponding to the images in the picture below by going from left to right.
- Match up a Light/White square and a Medium Aqua square right sides together. Mark a diagonal line from corner to corner on the back of the Light/White square and sew 1/4″ (or a little less) on each side of the line.
- Cut along the diagonal line. You will have 2 half-square triangle patches.
- Open up the patch and press the seam allowance toward the Medium Aqua fabric.
- Square up/trim the units to 2.5″ square.

Step 2:
Repeat Step 1 for a total of eight Half Square Triangle units.
You can find a detailed tutorial for sewing Half Square Triangles (HST) at https://quiltembroiderypdf.com/how-to-sew-a-basic-half-square-triangle-block

Hourglass Units:
Step 3:
Repeat Step 1 only using the Light/White 5.5″ squares and the Dark Green 5.5″ squares for a total of four units. DO NOT trim or square up the units at this time.
Using the picture below for a reference, sew together four Hourglass units.
- Match two of the half-square triangle patches, right sides together, and rotate one of the patches 180 degrees so the colors are opposing each other and the seam allowances nest together nicely.
- Mark a diagonal line on back of one of the patches perpendicular to the seam line and more or less from corner to corner.
- Sew .25” on both sides of the diagonal line and cut on the diagonal line.
- Open up the two units and press the seam allowance. I pressed using the tweak/twirl/furl method but you can press however you wish.
- Trim/square up the units to 4.5″ square.
You can find a detailed tutorial for making an Hourglass block in the tutorial https://quiltembroiderypdf.com/how-to-sew-a-basic-hourglass-or-quarter-square-triangle-block

Step 4:
Repeat Step 3 for a total of four Hourglass units. You can see from the bottom right image in the picture below how I pressed my seam allowances.

Corner Units:
Step 5:
Lay out two Half Square Triangle units, one Medium Aqua 2.5″ square, and one Light/White 2.5″ square as show in the picture below.

Step 6:
- Sew the units into two rows and press the seams as shown in the top two images in the picture below.
- Sew the two rows together and press the seam allowance. I pressed the seam allowance using the tweak/twirl/furl method as you can see in the picture below. (bottom two images)

Step 7:
Repeat Steps 5 and 6 for a total of four Corner units. This is the basic construction for a typical Four Patch block.

Putting It All Together:
Step 8:
Lay out the Medium Aqua 4.5″ square, the Hourglass units, and the Corner units as shown in the picture below. From here on, the block goes together like a typical Nine Patch block.

Step 9:
Sew the units into three rows.

Step 10:
Press the seam allowances away from the Hourglass units as shown.

Step 11:
Sew the three rows together to complete the block.

Step 12:
Press the seam allowances toward the center of the block as shown in the picture below. All finished!

If you would like a printable PDF download of this tutorial, you can buy it in my Etsy shop. This is totally optional. Click the button below to learn more.